Reviving the Retro: How to Connect Your Commodore 64 to a Modern Display using HDMI
Introduction
Commodore 64, also known as C64, was a popular home computer system released in 1982. It quickly became one of the bestselling personal computers of all time and is still remembered fondly by many users today.
The C64 is considered a groundbreaking system that brought affordable computing to millions of people around the world. Connecting Commodore 64 to HDMI is important for several reasons.
Firstly, it allows you to enjoy classic games and other software on modern HD displays without losing picture quality or clarity. Secondly, it makes it easier to connect your computer to other devices such as projectors or sound systems for presentations or events.
In this article, we will guide you through the steps required to connect your Commodore 64 computer to an HDMI display. We will also discuss the benefits of this process and provide you with troubleshooting tips in case you encounter any issues during setup.
A Brief History of the Commodore 64
The Commodore 64 was released by Commodore International in August 1982. It was designed primarily as a gaming machine but quickly found its way into homes and businesses worldwide due to its affordability and versatility.
The C64 was equipped with a MOS Technology 6510 processor running at speeds up to 1 MHz and had 64KB of RAM – hence its name. It featured advanced graphics capabilities for its time, including sprites and smooth scrolling, which made it popular among game developers.
Over its lifespan, Commodore sold over 17 million units worldwide before eventually discontinuing it in April of 1994. Since then, the C64 has remained a classic symbol of early home computing technology.
The Importance of Connecting C64 to HDMI
Connecting your Commodore 64 computer system to an HDMI display offers several advantages that help maximize your experience while using this device today. Firstly, HDMI cables provide a much clearer picture than older analog connections such as composite and S-video. This is because HDMI is a digital connection that transmits uncompressed audio and video signals, leading to better picture quality.
Secondly, HDMI connections offer the ability to connect to modern flat-screen TVs and displays common today. By connecting your C64 to an HDMI display, you can enjoy classic games and software on larger screens, with crisper images, sharper graphics, and more vibrant colors.
Overview of the Steps Required
Connecting your Commodore 64 computer system to an HDMI display may seem daunting at first. However, it’s a straightforward process that can be broken down into several steps.
Firstly, you will need to gather all the required materials for the job. These include an HDMI converter box, composite RCA cable for video output from the C64 console itself, a power supply for the converter box if required, an HDMI cable for connecting to your chosen display device (such as TV), and a screwdriver if needed.
Once you have gathered all necessary materials together in one place nearby where both devices are located near each other – usually on a desktop table or similar surface – it’s time to start connecting everything up. Next comes configuring settings on both your TV input source (if using one) and converter box settings themselves after plugging everything in correctly.
This includes things like selecting input source or resolution/aspect ratio setting options specific to either device – depending upon what is required by each manufacturer’s specifications – so that they work together properly when transmitting audio/video data between them. comes troubleshooting tips such as checking cables are plugged in correctly or making sure there is good contact between connectors when attempting any repairs or adjustments along this process.
Understanding the Commodore 64 Video Output
The Commodore 64 was released in 1982 and quickly became one of the most popular home computers of its time. One of its main features was its video output, which allowed users to connect it to a TV or monitor and play games or run software. However, the video output options available on the Commodore 64 were limited, and they pale in comparison to modern standards such as HDMI.
Types of video output available on the Commodore 64
The Commodore 64 had two main types of video output: RF (radio frequency) and composite RCA. The RF option is similar to an antenna connection and requires a special adapter that connects to the TV’s coaxial input.
The composite RCA option uses a yellow RCA connector, which provides better picture quality than RF but is still limited compared to modern standards. There were also other options available on some models such as S-Video, which provides slightly better picture quality than composite RCA but was not commonly used due to compatibility issues with TVs at the time.
Limitations of the video output options
The limitations of these options are numerous. With RF, picture quality was often poor due to interference from other signals in the area. Additionally, tuning in channels could be difficult since it required finding an unused frequency that didn’t interfere with any others.
Composite RCA provided slightly better picture quality than RF but still had limited color depth and resolution compared to modern standards. S-Video provided even better picture quality but was not commonly used due to compatibility issues with TVs at the time.
Why HDMI is a better option
HDMI is a much better option for connecting your Commodore 64 today because it provides superior image quality and is compatible with modern TVs and monitors. HDMI supports Full HD (1080p) resolution, which is more than sufficient for the Commodore 64’s capabilities. In addition, HDMI cables are widely available and easy to find, whereas finding a compatible RF or composite RCA cable can be difficult today.
HDMI also provides better sound quality than the other options since it carries both video and audio signals in the same cable. Overall, if you want to get the best picture quality out of your Commodore 64 today, connecting it via HDMI is the way to go.
Gathering Required Materials
Connecting a Commodore 64 to an HDMI port on a modern television requires specific materials. Most importantly, it will require an HDMI converter box, which will convert the analog signal from the Commodore 64 into a digital signal that can be displayed on modern TVs. Here is a list of necessary materials:
1) HDMI Converter Box
The first and most important item is the converter box itself. It is essential to find one that is compatible with the Commodore 64’s output and capable of converting it to HDMI output. There are many different types of converters available for purchase at electronics stores or online, with prices ranging from inexpensive to quite expensive depending on desired features.
2) Composite RCA cable
The second item needed for connecting a Commodore 64 to HDMI is a composite RCA cable. This type of cable has three connectors: yellow for video and white and red for audio signals. The video connector carries the analog signal from the computer which needs to be converted into digital format by the converter box.
3) Power supply for converter box
The third item required when connecting your Commodore 64 to an HDMI port on your TV is a power supply for your converter box. This will usually be included in your purchase or may need to be purchased separately depending on where you buy the converter box from.
4) HDMI cable
The fourth material required is an HDMI cable which connects from the converter box output port directly into any available HDMI port in your TV set.
5) Screwdriver (if required)
If you are connecting an older model C64 that uses RF signal or S-video connection, there may be some modifications you need to make which may require the use of a screwdriver. However, most modern Commodore 64s will use RCA cables for video and audio output, which are easier to connect and require no tools.
These are the necessary materials required to connect your Commodore 64 to an HDMI port on a modern TV. Ensure you have all of these items before starting the setup process.
Connecting Commodore 64 to HDMI Converter Box
Step-by-Step Guide for Connecting Composite RCA Cable from Commodore 64 to Converter Box
Once you have gathered all the necessary materials, the first step towards connecting your Commodore 64 to an HDMI display is plugging in the composite RCA cable into the video output of your computer. The RCA cable has three connectors; yellow for video and white/red for audio. You need to find the corresponding ports on your computer.
The Video Out port is located on the back of a Commodore 64, near the power switch. Connect one end of a composite RCA cable’s yellow connector into this port.
The other end of this yellow connector should be plugged into the input labeled “Composite” or “AV” on your HDMI converter box. If your Commodore 64 has an S-video port, you can use it instead of composite RCA but you will need to purchase an S-video cable separately (not included in our list of required materials).
Plug one end of an S-video cable into this port and connect its other end into S-Video In on your converter box. After connecting your composite or S-Video cable, plug in the power supply for converter box and turn it on.
Powering Up Converter Box and Connecting it to TV Using an HDMI Cable
The next step involves connecting the HDMI output from the converter box directly into any available HDMI input port on your TV. It is also important that you have an extra HDMI cable ready since most converters do not include it with their package.
If you are unsure which HDMI input slot corresponds with which number, refer to your TV’s manual or its online documentation. Some TVs even have labels such as “HDMI1” or “HDMI2” next to their physical connections.
Once the HDMI cable is successfully connected, power on your TV and switch to the correct input source. This can be done using your TV’s remote control buttons or by navigating through your TV’s settings if you cannot immediately see the picture coming from your Commodore 64.
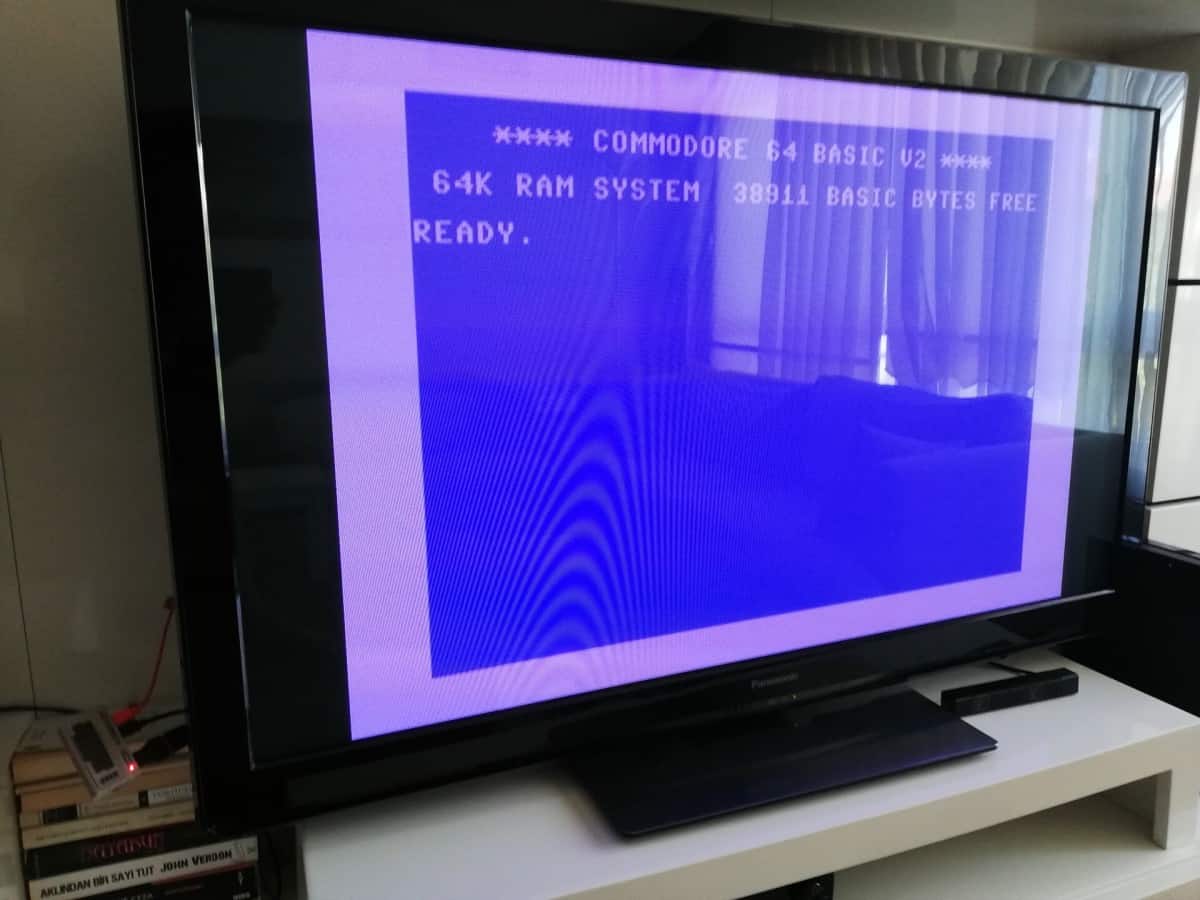
If all steps have been followed correctly, your HDMI converter box should now be displaying an image from the Commodore 64 on your TV screen. In case you cannot see any display or you are experiencing issues, do not panic as there might still be some minor issues that we will tackle in our troubleshooting guide later in this article.
Configuring Settings on TV and Converter Box
Setting up TV input source for HDMI connection
After connecting the Commodore 64 to the HDMI converter box and the converter box to the TV, the next step is to set up the TV input source. This is important because if you do not set up your TV correctly, you may not see any video signal from your Commodore 64. To set up the TV input source, locate the “Input” or “Source” button on your remote control.
Press it and scroll through until you find “HDMI”. Depending on your TV model, there may be more than one HDMI port so make sure you select the correct one where you connected your Commodore 64.
Once selected, switch on power to both devices i.e. turn on both your Commodore 64 computer and your television. If all goes well, you should see a signal from your computer immediately upon booting.
Configuring settings on converter box, such as resolution and aspect ratio
After successfully setting up the TV input source for HDMI connection, it’s time to configure settings on our HDMI converter box which vary depending on individual preference of what looks best and what works best with a given setup. The most common settings are resolution and aspect ratio but some models have advanced features that can optimize video output quality or reduce artifacts during scaling. In most cases however, setting output resolution should be straightforward as only adjusting a few buttons will change image size in real time allowing users to pick a comfortable size that fits their screen perfectly without loss of visual fidelity.
Aspect ratios determine how wide or tall an image is in relation to its height and thus varies depending on individual preferences based off each person’s setup needs; some people prefer widescreen while others like 4:3 for old school games. Most modern converters automatically detect this and adjust the aspect ratio of the screen accordingly.
Optimizing video output quality
While a typical HDMI converter box should be plug-and-play, some models have advanced settings that can improve video output quality. Examples of such features include Chroma Upscaling and Edge smoothing which help enhance color accuracy and reduce jagged edges in scaled images respectively.
If your converter box has such settings, it is recommended to experiment with them and see if they improve image quality. However, keep in mind that some advanced settings may also introduce latency or artifacts so use them carefully.
Reducing input lag
Input lag is the time it takes for a button press on a controller to register as an action on screen. It can be frustrating or ruin gameplay altogether if not reduced or eliminated.
The highest input lag often comes from the TV itself which may have post-processing features like motion smoothing or heavy picture processing enabled by default. To reduce input lag, ensure that these features are turned off.
Additionally, modern HDMI converters also have low latency modes that bypass scaling algorithms for faster transmission of video signals while minimizing delays. Turning this on can significantly reduce input lag resulting in smoother gameplay experience.
The Importance of Calibration
Calibration is the process of adjusting different display settings to ensure accurate color reproduction, contrast ratios and brightness levels among other things. While most HDMI converters do not require calibration due to their simple nature, there are some models with built-in calibration tools which help users get optimal image quality from their setup without needing external calibration tools like a Spyder5® monitor calibrator. By using built-in calibration options within your converter box (or TV) you will achieve an ideal balance between contrast/brightness as well as accurate color representation giving you the highest visual fidelity possible.
Troubleshooting Tips:
Problem 1: No picture on TV
If the TV does not display any image even after following all the connection steps, there might be an issue with either the Commodore 64 or the converter box. Double-check all connections and ensure that they are properly seated.
Try testing your Commodore 64 on another TV to rule out issues with your original TV. If you have another converter box, try using it to see if it resolves the issue.
Problem 2: Distorted or blurry image
If your image appears distorted or blurry on your TV, check if your converter box supports the resolution of the Commodore 64. Try changing the resolution settings on both your Commodore 64 and converter box to see if it improves image quality. You may also want to check for any interference from other electronic devices in close proximity to your equipment.
Problem 3: No sound
If you are not getting any sound through HDMI after connecting everything correctly, check if you have overlooked a setting related to audio output volume on either your Commodore 64 or converter box. You can also try switching out HDMI cables – sometimes faulty cables could be causing this problem.
Problem 4: Color distortion
If colors appear distorted or incorrect when playing games or displaying images from a Commodore 64 via HDMI, then there might be an issue with color encoding settings on either end of the connection. Check and adjust color settings through both devices until you find satisfactory results.
Conclusion:
The process of connecting a Commodore 64 to HDMI is relatively easy once you gather all required materials and follow instructions carefully. It can help one experience faster loading times and an overall improved display quality of retro games.
Troubleshooting any issues that may arise during setup can be resolved with the appropriate tools and know-how. While it can be frustrating when things do not work out as planned, don’t let these obstacles discourage you from enjoying this unique gaming experience.
With technology constantly advancing, it is possible to breathe new life into beloved old hardware and enjoy classic titles in a whole new way. So go ahead and give this connection method a try – you might just get hooked on the retro gaming scene all over again!