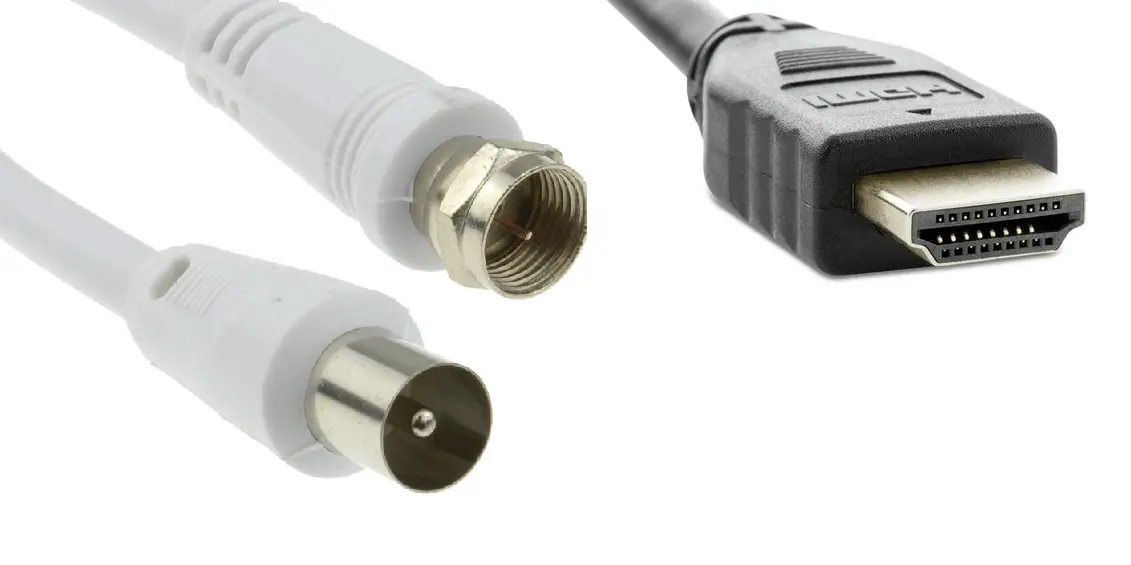
Introduction
If you own a vintage gaming console, old cable box, or any retro device with RF output, you’ve likely hit the same problem: modern HDTVs don’t have RF inputs. You can’t just plug in an RF cable anymore. You need a converter.
Here’s where most people make an expensive mistake: they buy an HDMI-to-RF converter thinking it will solve the problem. It won’t. Those devices do the opposite of what you need—they convert from HDMI to RF, so you can use modern streaming devices on old TVs.
What you actually need is an RF demodulator (also called an RF-to-HDMI converter). This guide will walk you through exactly what one is, how to choose the right one, and which models actually deliver the quality you’re paying for.
Quick Comparison: RF Demodulators That Work
| Product | Type | Price | Signal Quality | Best For | Buy |
|---|---|---|---|---|---|
| Professional RF Coax to HDMI Demodulator (RFDM200) | Professional Grade | £120–150 | 1080p upscaled, full channel support | Best overall, retro gaming, cable box conversion | Check Price on Amazon |
| Budget RF Demodulator | Consumer Grade | £60–80 | 720p–1080p, limited channels | Budget-conscious, casual use | See Options |
| ⚠️ HDMI-to-RF (Wrong Device) | — | £40–60 | N/A | DON’T BUY — Does the opposite of what you need | — |
What is RF, and Why Can’t Modern TVs Accept It?
RF stands for “Radio Frequency.” It’s how older devices transmitted video and audio signals before HDMI existed.
Here’s how it works: Your SNES, Commodore 64, Atari, or cable box sends out an RF signal through a coaxial cable. That signal is a modulated radio wave carrying both video and audio information bundled together. The TV receives it, demodulates it (extracts the video and audio), and displays it on screen.
Modern HDMI is completely different. It’s a digital signal with separate data streams for video, audio, and control signals. Your new TV doesn’t have the hardware to demodulate RF anymore—it only accepts HDMI, DisplayPort, or other digital inputs.
The solution: An RF demodulator takes that modulated RF signal, demodulates it back into analogue video and audio, then digitises it into a format your modern TV can understand (HDMI or DVI).
Why this matters: Without a demodulator, your retro console or cable box simply won’t work on a modern TV. You can’t adapt it with a cable alone.
Why You Probably Have the Wrong Device (And How to Avoid It)
The biggest mistake retro enthusiasts make is buying an HDMI-to-RF converter. These are marketed as “RF converters” but they do the reverse of what you need.
HDMI-to-RF converters:
- Take a digital HDMI signal and convert it to analogue RF
- Used for connecting modern streaming devices (Fire Stick, Apple TV) to old TVs
- Cost £40–60
- Completely useless for connecting retro gear to modern TVs
RF-to-HDMI demodulators (what you actually need):
- Take an analogue RF signal and convert it to digital HDMI
- Used for connecting retro gear (SNES, cable boxes, Commodore) to modern TVs
- Cost £60–150
- Essential for retro gaming on modern displays
Before you buy, check your actual problem: Are you trying to connect old equipment to a new TV, or new equipment to an old TV? If it’s the former, you need an RF demodulator.
Types of RF Demodulators: Professional vs. Consumer Grade
Professional Grade RF Demodulators (The RFDM200 Standard)
The Professional RF Coax to HDMI DVI Demodulator (RFDM200, ASIN B01GUF7CZ4) is the industry standard for serious retro setups.
Specifications:
- Input: Full RF/coax support (UHF, VHF, CATV, satellite frequencies)
- Output: Both HDMI and DVI (flexibility for different TVs)
- Upscaling: 1080p HDMI or 1920×1200 DVI
- Signal Processing: Professional-grade signal conditioning and filtering
- Tuning: Automatic or manual channel selection
- Use Cases: Works with cable boxes, old consoles, any RF source
Pros:
- Accepts any RF input (not just specific consoles)
- Full channel frequency support (critical for cable boxes)
- Professional signal conditioning = cleaner output
- Both HDMI and DVI outputs (useful if your TV only has DVI)
- Rack-mountable (if you’re serious about your setup)
Cons:
- Higher price point (£120–150)
- Oversized for casual single-console use
- More features than most home users need
Who should buy this: Anyone with a cable box, satellite receiver, or multiple retro devices. Anyone who wants the absolute best signal quality.
Price check: Check current price on Amazon UK | Check on Amazon US
Consumer Grade RF Demodulators
Budget alternatives exist, but quality varies wildly. Consumer-grade units typically:
- Cost £60–80
- Support basic RF input (may be limited to specific frequencies)
- Output 720p or 1080p HDMI only
- Have minimal signal conditioning (picture quality may suffer from noise/distortion)
- Often limited to a specific region’s TV standards (NTSC, PAL, SECAM)
When to consider budget options: If you’re converting a single console in a specific region and want to save £50–60. Don’t expect the same signal quality as professional grade.
When to avoid them: If you have a cable box or satellite receiver, if you live in a region different from the device, or if you care about picture quality. The professional RFDM200 is worth the extra cost.
How to Choose the Right RF Demodulator
Not all RF demodulators are equal. Ask yourself these questions before buying:
1. What device are you connecting?
- Old game console (SNES, Genesis, Atari, C64): Any decent demodulator works. Consumer grade is fine.
- Cable box or satellite receiver: You need full frequency support. Professional grade only (like the RFDM200).
- Multiple devices across regions: Professional grade for flexibility.
2. What region/TV standard does your device use?
This is critical. Most demodulators only support ONE TV standard:
- NTSC: North America, Japan (most common for US retro gear)
- PAL: Europe, UK, Australia, many consoles
- SECAM: France, Russia (rare for home use)
If your device uses NTSC but you buy a PAL demodulator, it won’t work. The RFDM200 supports multiple standards, which is one reason it’s worth the premium.
Check your console or cable box for markings like “NTSC” or “PAL”—usually printed on the back.
3. What outputs does your TV have?
- HDMI only: Any modern demodulator works
- DVI only: You need a demodulator with DVI output (the RFDM200 has both)
- Both: Maximum flexibility with the RFDM200
4. Signal quality vs. budget
- £120+: Professional RFDM200—cleanest signal, full support, overkill for single console but perfect for serious setups
- £60–80: Budget consumer grade—acceptable for basic retro gaming, risky for cable boxes or high-quality setups
Step-by-Step: Installation and Setup
What You’ll Need
- Your RF demodulator (e.g., RFDM200)
- Coaxial RF cable (often included with your console or cable box)
- HDMI cable (for the demodulator-to-TV connection)
- Your retro device or cable box
- A modern TV with HDMI input
Installation Steps
1. Connect the RF Source to the Demodulator
- Take the coaxial cable from your retro console, cable box, or satellite receiver
- Plug it into the RF Input port on the demodulator (marked “RF In” or “Coax In”)
- Screw the connector in firmly—loose connections cause signal loss
2. Connect the Demodulator to Your TV
- Take an HDMI cable from the demodulator’s HDMI Output
- Plug it into an available HDMI input on your TV
- Make note of which HDMI port you used (e.g., HDMI 1, HDMI 2)
3. Power On the Demodulator
- Some models are powered via USB; others need a wall adapter
- Wait 10–15 seconds for it to boot and detect the signal
4. Switch Your TV to the Correct HDMI Input
- Use your TV remote to select the HDMI port where you connected the demodulator
- You should see a picture appear (or a blue screen if no signal is detected)
5. Tune the Demodulator to Your Device’s Frequency
- Most demodulators have an Auto Tune function—press it and let it search for the signal
- If auto-tune doesn’t work, manually select the frequency:
- Most SNES and other consoles use channel 3 or 4
- Cable boxes and satellite receivers typically need to be tuned to their specific channel frequencies (check your cable provider)
6. Test the Signal
- If you’re using a console, start a game
- If you’re using a cable box, tune to a channel
- Adjust the demodulator’s settings if the picture is noisy, distorted, or off-colour
Troubleshooting Common Issues
No signal / blue screen:
- Ensure the RF cable is firmly screwed into both the console and demodulator
- Try the Auto Tune function
- Check that your TV is on the correct HDMI input
- Verify that your retro device is powered on and outputting RF (not composite video)
Snowy, distorted, or noisy picture:
- RF cables are sensitive to interference. Move the demodulator away from WiFi routers, microwaves, or radio transmitters
- Replace the RF cable if it’s old or damaged
- Check that the cable connections are tight (even loose coax connections degrade signal)
- Professional demodulators like the RFDM200 have better signal filtering to reduce this
No audio or only mono audio:
- Some demodulators require audio output configuration. Check the manual.
- Verify your TV’s audio settings—it may be muted or set to a different input
Wrong colours or brightness issues:
- Most demodulators have brightness/contrast adjustments in a menu. Check your manual.
- If available, try switching between NTSC and PAL modes to see if one looks better
Why the RFDM200 (And Professional Demodulators) Actually Deliver
If you’re wondering why a professional RF demodulator costs £50 more than budget options, here’s what you’re paying for:
1. Signal Conditioning
The RFDM200 includes hardware filtering that removes noise and interference from the RF signal. This results in a cleaner, sharper picture with less snow, distortion, or colour drift. Budget demodulators skip this, so you get noisier output.
2. Full Frequency Support
It accepts any RF frequency in the UHF/VHF range. Budget units are often limited to specific channels or regions. If you ever want to use a cable box, satellite receiver, or a console from a different region, full-frequency support is essential.
3. Dual Output (HDMI + DVI)
The RFDM200 has both HDMI and DVI outputs. This means it works with older TVs that only have DVI input, and modern TVs with HDMI. Budget units are often HDMI-only.
4. Build Quality
Professional units are designed to run 24/7 in broadcast or cable environments. They’re built to last. Budget units may fail after a few years.
Bottom Line
For a one-time retro setup you’ll use for years, the RFDM200 is worth every penny. The picture quality and reliability difference is noticeable.
Check the RFDM200 Price on Amazon
Frequently Asked Questions
Q: Will an HDMI-to-RF converter work instead?
A: No. HDMI-to-RF does the opposite—it converts modern HDMI sources to RF for old TVs. You need RF-to-HDMI, not the other way around.
Q: What’s the difference between NTSC and PAL?
A: They’re incompatible TV standards from different regions:
- NTSC (60 Hz): North America, Japan, Brazil. Used by most US retro consoles.
- PAL (50 Hz): Europe, UK, Australia, Africa. Used by European and Australian consoles.
A console designed for NTSC won’t display properly on a PAL demodulator, and vice versa. Always match the standard to your device.
Q: Can I use this with a projector instead of a TV?
A: Yes. As long as your projector has an HDMI input (most do), an RF demodulator will work. Just connect the HDMI output to the projector instead of a TV.
Q: Will upscaling improve the picture quality?
A: Somewhat. Upscaling to 1080p makes the image larger and sharper on modern TVs, but it can’t create detail that wasn’t in the original signal. A noisy RF signal will still be noisy when upscaled. The RFDM200’s signal conditioning (filtering) is more important than the upscaling.
Q: Can I use this with a digital TV tuner or DVR?
A: Only if it outputs RF. Most modern DVRs output HDMI directly, so you don’t need a demodulator. Older cable boxes and satellite receivers that use RF? Yes, use a demodulator.
Q: How long do these things last?
A: Professional units like the RFDM200 are built for continuous use and can last 10+ years. Budget units typically last 3–5 years. Solid electronics with good ventilation tend to outlive cheap alternatives.
Final Thoughts
Converting RF to HDMI isn’t complicated once you understand what you’re doing. The biggest mistakes happen when people buy the wrong device (HDMI-to-RF instead of RF-to-HDMI) or choose a budget demodulator that doesn’t support their device’s region or frequency.
For the best results: Invest in a professional-grade RF demodulator like the RFDM200. It’s £50–60 more than budget options, but you’ll get cleaner signal, better compatibility, and hardware that lasts. For a retro setup you’ll use for years, that’s money well spent.
Your next step: Identify which device you’re connecting (console, cable box, etc.), note its RF standard (NTSC or PAL), and get the right demodulator. Then follow the setup steps above.
Once it’s connected, you’ll be able to enjoy your retro hardware on modern TVs the way it was meant to be seen.
Related Guides
Best FPGA Consoles for Retro Gaming: Analogue Pocket vs. MiSTer vs. Evercade
Best CRT TVs for Retro Gaming in 2025 (recommended reading: if you’re serious about retro, a real CRT will always beat a modern TV upscaling old signals)
How to Connect a Sega Genesis to a Modern TV