The Amiga 1200 was a popular home computer released by Commodore in 1992. After 30 years, it’s common for the electrolytic capacitors on the motherboard to start leaking or fail. Recapping involves replacing all aged capacitors to restore functionality and prevent further damage. This guide provides a step-by-step walkthrough of the recapping process for the A1200.
Why Recap an Amiga 1200?
There are a few key reasons you may want to recap an aging Amiga 1200:
- Prevent leaks and corrosion – Leaky capacitors can corrode the motherboard and destroy components. Recapping removes this risk.
- Fix stability issues – Failed or out of spec capacitors can cause crashes, glitches, and odd behavior. Recapping restores stability.
- Restore functionality – An A1200 with multiple failed capacitors often won’t boot or function properly until the caps are replaced.
- Extend lifespan – The new capacitors will last another 10-20 years in most cases, extending the usable lifespan.
- Improve performance – New capacitors ensures stable clean power delivery for maximum performance.
Recap work breathes new life into aging Amiga 1200s, making them reliable for regular use. It’s a worthwhile investment for owners of this classic computer.
Preparation
Recapping an Amiga 1200 involves delicate soldering work. Here are some tips to prepare your workspace and equipment:
- Clear open bench space – You’ll need room to work comfortably and safely.
- Good lighting – Bright task lighting ensures you can see the boards clearly.
- Soldering iron – A fine tip 30-40W iron with variable temperature is ideal.
- Solder sucker – Used to remove old solder from joints. A spring loaded model works best.
- Solder wick – Helps remove stubborn solder residue from pads.
- Flushing agent – Isopropyl alcohol removes grime and old flux from the boards.
- Magnifying glass – Helps inspect joints and alignment during soldering.
- Small tools – Needle nose pliers, tweezers, screwdrivers etc. come in handy.
- Capacitor kit – Contains all the correct replacement capacitors for an A1200 recap.
Taking the time to properly set up your workspace helps the recap job go smoothly and safely.
Disassembly
With the workspace prepped, now we’re ready to disassemble the Amiga 1200 and remove the motherboard:
- Remove any peripherals and cables connected to the rear ports.
- Carefully turn the case over and remove the 6 screws from the bottom case molding.
- Lift off the plastic bottom case plate.
- Remove the metal RF shielding plate – 2 screws secure it.
- Disconnect the power LED connector from the board.
- There is one screw near the keyboard securing the motherboard. Remove it.
- Locate the side tabs securing the keyboard. Gently depress them from the rear case side using a small flat screwdriver.
- Lift the keyboard upwards delicately. The ribbon cable still connects it to the motherboard.
- Flip up the locking tabs on the keyboard connector and gently pull upwards to disconnect the ribbon cable.
- Remove the motherboard completely now – lift it out carefully.
With the board removed, we’re ready to begin the recap process. Be very gentle handling the exposed board.
Capacitor Removal
Now we can start replacing capacitors. Here are the steps for safe removal:
- Identify each capacitor on the board and how it is installed. Note orientation.
- Apply flux evenly across the joints on one side of the cap using a flux pen. This aids solder flow.
- With the soldering iron heated to 700-800°F, press each solder joint to heat it up.
- Using the solder sucker, position the nozzle by the molten joint and release the spring plunger firmly to vacuum up the solder.
- Check that the solder joint is completely cleared. Use solder wick if residue remains.
- Repeat steps 3-5 for the second solder joint. The capacitor lead should lift free once both joints are cleared.
- If leads are bent, use pliers to straighten them before pulling the capacitor free.
- Repeat the process carefully for every capacitor you are replacing.
Take it slowly, making sure joints are fully cleared of solder before removing capacitors. This prevents pad lifting or board damage.
Capacitor Installation
With the old capacitors removed, it’s time to install the new replacements:
- Double check the capacitor values match what you removed using the coding on the sides.
- Insert the new capacitors into the vacant holes, following the original orientations.
- Bend the leads outward slightly to anchor them before soldering.
- Apply flux to both empty pads and heat up the joint area with the iron.
- Feed a small amount of fresh solder onto each joint to anchor the leads. Don’t overfill.
- Inspect both solder joints carefully for full coverage of pad and lead. Reheat and feed more solder if voids are present.
- Once all capacitors are installed, clip off any excess lead length close to the joints.
- Thoroughly clean the board with isopropyl alcohol and an old toothbrush to remove all flux residues.
Carefully follow polarity markings and triple check values and placement as you install new caps. This prevents damaging shorts or unstable operation later on.
Recap Best Practices
Here are some top tips to follow when recapping an Amiga 1200:
- Work slowly and carefully at all times. Rushing leads to mistakes and damage.
- Only apply the minimum heat needed to clear/make joints to avoid board damage.
- Use fresh flux and solder for best results. Old flux and oxidized solder causes poor joints.
- Take photos during disassembly for reference to ensure correct reassembly.
- Refer to recap guides or diagrams if unsure of capacitor values and placement.
- Thoroughly clean the board of all flux residue when finished recapping.
- Visually inspect every joint under magnification after soldering for quality.
- Double check capacitors match the specified values as you install them.
Exercising care, patience and attention to detail is crucial for a successful recap job without issues down the line.
Powering Up After Recapping
Once the new capacitors are installed, it’s time for the exciting moment of powering up the board! Follow these steps:
- Visually inspect all capacitor joints again under magnification to confirm sound soldering.
- Reinstall the motherboard into the case securely. Reattach all connectors.
- Have a fire extinguisher on hand as a safety precaution. Faulty caps can run hot.
- Connect just the power adapter and video cable, no peripherals.
- Plug the Amiga 1200 power adapter in and turn it on. The LED should light up!
- There may be no video output yet – allow 15 minutes for capacitors to reform.
- After 15 minutes, touch your fingers to the large capacitors checking for excessive heat which indicates a short.
- If capacitors remain cool, connect a monitor and it should now display!
Take it slowly and be alert for shorts or instability after powering up from a recap. But in most cases, you’ll have a perfectly functioning Amiga 1200 again!
Recap Troubleshooting
In the event your newly recapped Amiga 1200 encounters issues, here are some steps to troubleshoot:
- No power at all – Check adapter connection, LEDs, fuses and power switch function.
- Power LED but black screen – Allow full 15 minute reforming time. Substitute known good PSU.
- Unstable display – Possibly cold solder joint. Reflow all capacitor joints with fresh solder.
- Glitches or odd behavior – Double check capacitor values match recap diagram. Mismatched values cause issues.
- Excessive heat from capacitors – Indicates short circuit. Power down immediately and inspect joints.
- Corrosion around joints – Joint was poorly heated resulting in flux residue accumulating moisture. Clean thoroughly.
Carefully inspecting connections and joints will help identify most common recap issues that prevent a successful power on.
Recapping the A1200 PSU
The Amiga 1200 switch mode power supply unit (PSU) contains capacitors that also age and fail. Here is the recap process:
- Open the PSU case by removing screws – usually 5 on the underside.
- Desolder or clip all 4 large capacitors present. These are the usual failure points.
- Thoroughly clean the PSU board with isopropyl alcohol using an old toothbrush.
- Install the 4 specified replacement capacitors following the correct polarity and values.
- Reassemble the PSU case and install back into the A1200.
- Follow the power on procedure above to ensure the recapped PSU functions properly.
Recapping the PSU removes the fire risk of bulging and leaky caps and gives it renewed lifespan.
Conclusion
Replacing aged capacitors in an Amiga 1200 may seem daunting but takes patience and care. Following this guide, you should be able to successfully recap both the motherboard and PSU to get your A1200 running reliably for years to come. Take it slow, double check everything, and enjoy bringing this classic computer back to life!
Frequently Asked Questions
What tools do I need to recap an Amiga 1200?
You’ll need a fine tip soldering iron, solder sucker, solder wick, solder, flux, isopropyl alcohol, small screwdrivers, pliers, magnifying glass and forceps. A proper recap kit provides all required capacitors.
How do I know which capacitors need replacing?
Visually inspecting the tops of capacitors will show bulging, leaking or split caps. Recap diagrams indicate the values and placement. Capacitors 30+ years old should be replaced as a precaution.
Where can I find the correct capacitor values?
Consult Amiga 1200 recap guides which include detailed diagrams of the motherboard showing exactly where each capacitor value goes. Always double check your replacements match the diagrams.
What capacitors fail most often in the A1200?
The large power filter caps near the PSU connector, CPU decoupling capacitors and video RAM decoupling caps are most prone to failure and should always be replaced.
Is recapping an Amiga 1200 worth it?
Absolutely – recap work extends the life of the computer by many years and restores stability and speed by ensuring clean steady power delivery. It’s very worthwhile for owners of this classic.
How do I know if I damaged a trace or lifted a pad?
Inspect under magnification after removing old capacitors. Lifted pads will be raised at one corner. Damaged traces interrupt the copper between pads. Both can be repaired but take skill.
Can I use new capacitors with higher voltage ratings?
Yes, using caps rated for at least 105°C is recommended. Higher voltage rating is fine as long as capacitance value is identical. The improved specs last longer.
My A1200 won’t boot up after recapping. What should I check?
Ensure you allowed adequate reforming time – up to 15 minutes. Check carefully for shorts around joints, mismatched capacitor values and cold solder joints not making proper contact. Reflow joints with fresh solder if uncertain.
Amiga 1200 Capacitor Replacement: Is it Really Necessary?
All Amigas that havnt had it done already will definatly need its capacitors replacing to protect it from any damage in the future. All computers designed and built back in the 80s and 90s were never meant to still be in operation today.
Because the manufacturing was made to be as inexpensive as possible and to keep costs low, manufaturing companies would use low cost parts that were fit for purpose but would not necesarily last as long as you might want.
What is Amiga Recapping?
One of the main components that dont last are the through hole and surface mount electrolytic capacitors. These capacitors contain an electrolyte or liquid that over time can leak out of the capacitor and all over the PCB possibly causing corrosion and other damage to the surrounding componants and the PCB traces. Damage can occur and the capacitors can leak even if the machine isnt used at all.
All thought most leaky capacitors are easy to spot because the outcan is abviously split and the electrolyte is visible leaking out, it is possible that most caps have split at the bottom against the PCB and can go undetected unless the capacitor it removed from the PCB.
Sometimes its possible to spot a leaky capacitor by checking that the surrounding solder isnt dull or showing a greenish color. Sometimes the capacitor my even detach from the pads altogether.
https://www.ebay.co.uk/i/164318682742
The Life Expectancy of Electrolytic Capacitors
How Long does an Electrolytic Capacitor usually last?
The life expectancy of electrolytic capacitors depends on it operational conditions. But any electrolytic capacitor over 20 years old should be replaced. The higher the temperature of the PCB the shorter the life and also the higher the voltage the shorter the life. Electrolytic capacitors fitted to a circuit should be rated for at least double the circuit voltage.
For every 10 degrees lower than the operating temperature of the device than the max rating it should last at least twice as long.
The main thing to remember for old computers such as the Amiga 1200 is that electrolytic capacitors last much long when they are switched on.
So any equipment that has been in storage for any conciderable amount of time will definatly need its capacitors completely replacing.
You can replace the electrolytic capacitors with new ones which will give you another 20 more years of reliable use or you can spend a bit more and replace the electrolytic caps with solid polymer capacitors which will last much much longer.
What are Polymer Capacitors?
Solid Polymer capacitors and electrolytic capacitors both are able to store electricity and discharge it when its required. The difference, however, is that solid capacitors contain a solid organic polymer, while electrolytic capacitors use a common liquid electrolyte, hence, the terms solid capacitor versus electrolytic capacitors. So how does this actually effect the capacitor’s performance?
| Solid capacitors and electrolytic capacitors both store electricity and discharge it when needed. The difference, however, is that solid capacitors contain a solid organic polymer, while electrolytic capacitors use a common liquid electrolyte, hence, the terms solid capacitor versus electrolytic capacitors. So how does this actually effect the capacitor’s performance? | ||
| Six times longer lifespan In terms of lifespan, solid capacitors last longer than electrolytic capacitors, especially at lower working temperatures. As the table below shows, as the temperature decreases, the lifespan for solid capacitors increases. At 65◦C, the average lifespan for a solid capacitor is more than six times greater than electrolytic capacitors. In actual years, the solid capacitor will last approximately 23 years, while the electrolytic capacitor dies after only three years. Granted, most people will replace their motherboard long before 23 years, but clearly, solid capacitors have a lifetime advantage over electrolytic capacitors. | ||
| Average Lifespan of Solid Caps. vs. Electrolytic Caps | ||
| Temp°CElectrolytic Capacitors (Working Hours)Solid Capacitors (Working Hours)95◦C4,000 Hrs6,324 Hrs1.5X longer85◦C8,000 Hrs20,000 Hrs2.5X longer75◦C16,000 Hrs63,245 Hrs4X longer65◦C32,000 Hrs200,000 Hrs6.25X longer | ||
| Higher tolerance for high frequencies & temperatures Solid capacitors have a higher tolerance not only for higher temperatures, but they also perform better with higher frequencies and higher current than electrolytic capacitors.First, let’s try to understand the higher tolerance for high frequencies. In order to do this, we must first understand a little bit about Impedance. Impedance is a measure of the overall opposition of a circuit to current and is measured in ohms (Ω). A better way to phrase this might be to say that impedance is how much the circuit (in this case the capacitor) impedes the flow of current. The less the flow of current is impeded, the better. Less impedance also means less heat is generated. | ||
| The chart above shows that solid capacitors are able to deliver substantially lower impedance at higher frequencies. Because there is less impedance at higher frequencies, solid capacitors are more stable and generate less heat than electrolytic capacitors.Solid capacitors also deliver more stable capacitance and are less likely to be affected by temperature changes. As the chart below shows, even at extreme temperatures, solid capacitors have relatively stable capacitance, especially when compared to electrolytic capacitors. | ||
| By being able to tolerate higher frequencies and higher temperatures, solid capacitors not only last longer, but they also deliver increased stability and performance over electrolytic capacitors. | ||
No more exploding capacitors A few years ago, some people started experiencing problems with their electrolytic capacitors on their motherboards. Users began noticing bulging, or swelling of the capacitors, and in some cases, the capacitors were even leaking fluid. Obviously, this dramatically lowered their system’s performance, and in several cases, damaged the motherboard to the point where it no longer operated. | ||
| There has been a lot of speculation as to what actually caused these capacitors to fail. One theory was that the electrolytic solution used by some manufacturers for a number of capacitors was faulty. That aside, even the highest quality electrolytic capacitors can fail. Take for example an “always on” system in an internet café. The strain put on the capacitors in terms of constant, prolonged usage, as well as high system temperatures can easily lead to capacitor failure. Remember, an electrolytic capacitor running at 85◦C has an average lifespan of just 8,000 hours, which is less than one year. | ||
| As there is no liquid component to solid capacitors, they don’t experience leaking or exploding. In addition, their ability to tolerate extreme conditions and their overall robustness, make them much more suited to extreme stress operation. |
| Benefits of All Solid Capacitor Design: Longer Life TimeIncreased StabilityIncreased ReliabilityBetter Overclocking PerformanceNo Exploding Capacitors | ||
| Generating less heat then their electrolyte counterparts, solid capacitors last on average 6 times longer, helping to ensure your system never quits. Additionally, solid capacitors have a higher tolerance not only for higher temperatures, but they also perform better with higher frequencies and higher current than electrolytic capacitors. The excellent heat resistance and better electric conductivity allows enthusiasts to tweak the highest levels of performance from their system without fear of excessive capacitor wear or exploding capacitors. |
solid polymer capacitor vs electrolytic
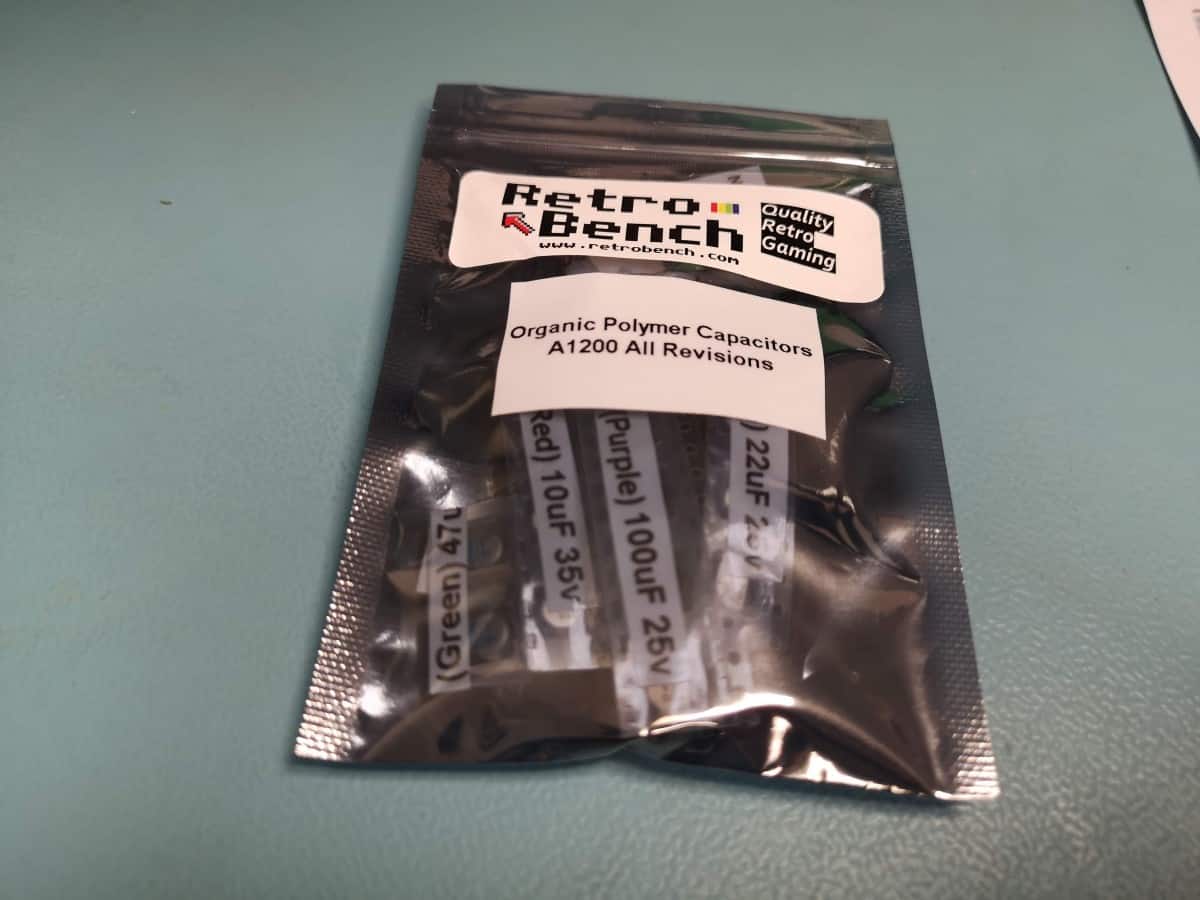
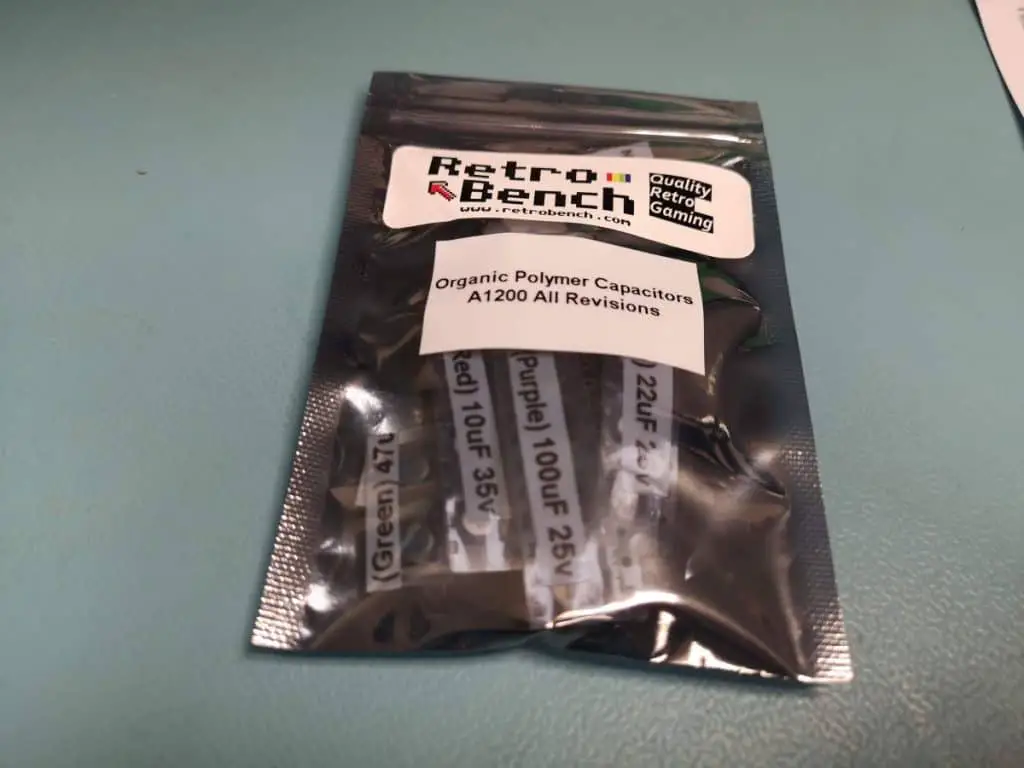
AMIGA 1200 A1200 COMMODORE | PREMIUM Organic Polymer | Re-cap Capacitor Kit
Amiga 1200 capacitor list
5 SMD 22 uF 35 VDC, EEHZA1V220R
2 SMD 47 uF 35 VDC, EEHZA1V470P
4 SMD 100 uF 25 VDC, EEHZA1E101XP
3 SMD 10 uF 50 VDC, EEHZA1H100R
2 470 uF 25 VDC, EEUFR1E471 (Through hole)
2 1000 uF 10 VDC, EEUFR1A102L 6 (Through hole)
SMC metal capacitors:
10µF – 25 Volts (x4)
22µF – 25 Volts (x5)
100µF – 25 Volts (x4)
47µF – 16 Volts (x2)
Verticals Electrolytic Capacitors:
1000µF – 16 Volts (x2)
470µF – 16 Volts (x2)
Amiga 1200 capacitor kit
AMIGA 1200 A1200 COMMODORE | PREMIUM Organic Polymer | Re-cap Capacitor Kit
By popular demand – Brand NEW PREMIUMORGANIC POLYMER Capacitor Repair Kit for Amiga A1200 Computers!
What are Organic Polymer Capacitors and why are they more expensive? They are electrolytic capacitors with a solid electrolyte rather than a liquid electrolyte…which means they will NEVER LEAK AGAIN!
Is your Amiga 1200 having issues, artefacts or weird sound? Have your capacitors leaked?
If your beloved Amiga has not been re-capped, it’s time to keep it alive!
Comes with colour-coded easy re-capping guide. PREMIUM Caps – Give your Amiga the BEST!
Included in this Premium DIY Kit:
- BRAND NEW 100% Genuine Branded Organic Polymer Caps (SMD & Through-Hole)
- EASY to use Colour-coded Recapping Guide!
- Shipped in an ANTI-STATIC BAG
- FREE Date of Recap Stickers! (Fill out with a Pen)
- FREE UK Mainland Domestic Postage!
- LOW International Postage!
- 30-Day Dead-On-Arrival Guarantee!
Brands are: United-ChemiCon, Panasonic, Wurth, KMET, – please note caps may not look *exactly* like ones in picture as some are changed due to stock availability.
List of Caps: 1x 10uF 25v Tant | 4x 10uF 25v | 4x 100uF 25v | 2x 470uF 16v | 5x 22uF 35v | 2x 1000uF 10v/16v | 2x 47uF 16v
Requirements:
- Correct tools & materials for recapping (soldering iron, solder, SMD removal tools, desoldering tools etc)
- Amiga A1200 (All motherboard revisions)
- User with knowledge of how to install and use product.
Note: Retrobench accepts no liability in the use of this product. Use at your own risk.
We also sell regular Electrolytic Capacitor kits which are cheaper – take a look at our other items.
Thanks for looking!
All items are the HIGHEST quality.
AMIGA 1200 A1200 COMMODORE Recapping Capacitor Kit – HIGH Quality PANASONIC CAPS
Brand NEW GENUINE PANASONIC Capacitor Kit for Amiga A1200 Computers!
Is your Amiga 1200 having issues, artefacts or weird sound? Have your capacitors leaked?
If your beloved Amiga has not been re-capped, it’s time to keep it alive!
Comes with colour-coded easy to read re-capping guide. LOW PRICE!
Included in this DIY Kit:
- BRAND NEW 100% Genuine Panasonic Long-Life Caps (SMD & Through-Hole – please note physical size may be different from picture due to supply availability)
- NEW Tantalum Solid State Cap (For 2B Revision Amiga Motherboards)
- EASY to use Colour-coded Recapping Guide!
- Shipped in ANTI-STATIC BAG
- FREE Date of Recap Stickers! (Fill out with Sharpie Pen)
- FREE UK Mainland Domestic Postage!
- LOW International Postage!
- 14-Day Dead-On-Arrival Guarantee!
List of Caps:
4x 10uF 25v | 4x 100uF 25v | 2x 470uF 16v | 5x 22uF 35v | 2x 1000uF 10v | 2x 47uF 16v | 1x 10uF 25v (KEMET Tantalum) – please note caps may not look *exactly* like ones in picture as some are changed due to stock availability.
Requirements:
- Correct tools & materials for recapping (soldering iron, solder, SMD removal tools, desoldering tools etc)
- Amiga A1200 (All motherboard revisions)
- User with knowledge of how to install and use product.
Note: Retrobench accepts no liability in the use of this product. Use at your own risk.
Thanks for looking!