The Yellowing Issue of the Commodore 64c
Make sure to use enough Retrobright mixture to fully coat the yellowed areas. You don’t want any spots left untouched, or else you’ll end up with an uneven result.
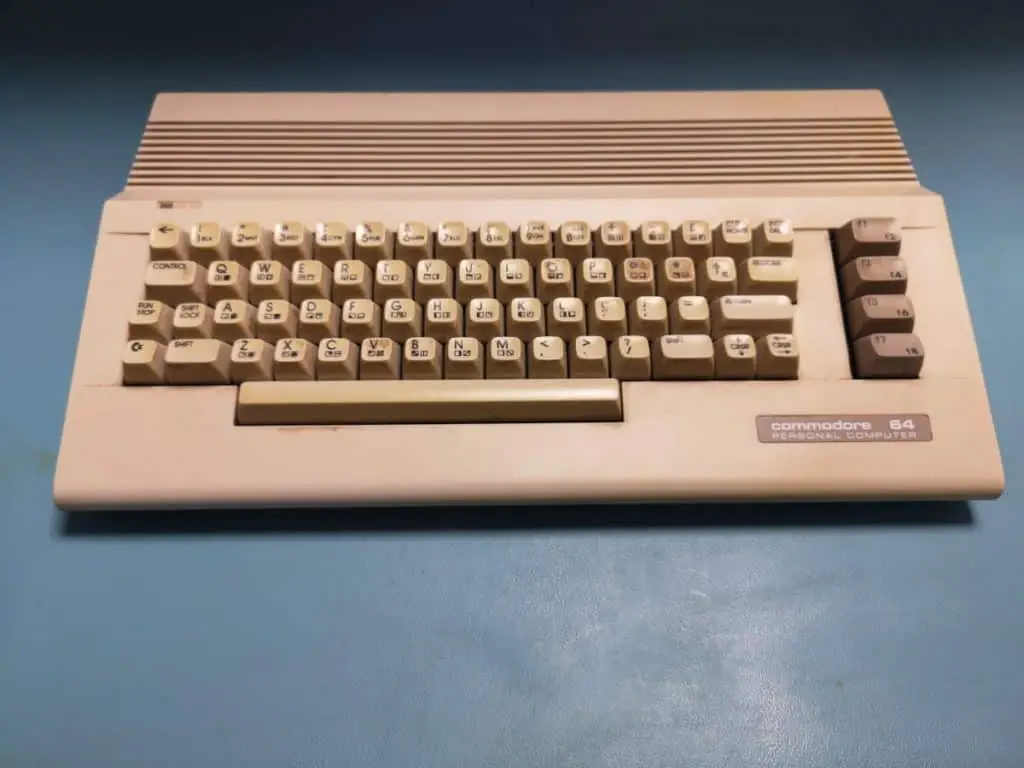
If you’re a vintage computer enthusiast, you might have heard about the yellowing issue that affects a lot of plastic parts from old electronics. This is particularly noticeable in the case of the Commodore 64c, a home computer released in 1986 as an improved version of the legendary Commodore 64.
The Commodore 64c was a great machine for its time, boasting an impressive 64 kilobytes of memory and top-notch sound and graphics capabilities. However, its plastic case was made with a material called ABS (acrylonitrile butadiene styrene), which has a tendency to turn yellow over time when exposed to UV light or heat.
This yellowing effect doesn’t only affect the appearance of the computer; it can also weaken the plastic and make it more brittle, which could lead to cracking or other damage. That’s why it’s important to take care of your vintage computers and try to preserve them as much as possible.
The Importance of Retrobrighting for Preservation and Aesthetics
Thankfully, there is a solution to this yellowing issue: Retrobrighting. This is a process that involves applying a mixture of hydrogen peroxide and other ingredients onto the affected parts of your Commodore 64c (or any other yellowed electronic device), then exposing it to UV light for several hours. The result is usually an almost-complete restoration of the original color.
Not only does Retrobrighting improve the aesthetics of your retro computer or console, but it can also help preserve its condition by preventing further damage caused by UV radiation or heat. It’s also worth mentioning that some collectors are very picky about cosmetic issues like yellowing when buying vintage electronics, so Retrobrighting might even increase their value if you plan on selling them someday.
So if you own a yellowed Commodore 64c or any other vintage electronic device, don’t despair – Retrobrighting could be the answer to your problems. In the following sections, we’ll walk you through the process step by step and give you some tips and tricks to make it as easy and effective as possible.
Materials Needed
Hydrogen Peroxide (30%)
The main ingredient in the Retrobright mixture is hydrogen peroxide. It is important to use a concentration of 30% or higher to ensure that it is effective in removing the yellowing from the Commodore 64c. You can purchase hydrogen peroxide from your local beauty supply store or online retailers like Amazon.
Xanthan Gum or Cornstarch
To create a gel-like substance that will stick to the surface of the Commodore 64c, you will need either xanthan gum or cornstarch. Xanthan gum is a common food thickener that can be easily found in stores, while cornstarch is an alternative for those who may be allergic to xanthan gum. Both ingredients work equally well in creating the Retrobright mixture.
UV Light Source (Sunlight or Lamp)
In order for Retrobrighting to work effectively, you will need a UV light source. This can either be natural sunlight or an artificial lamp that emits UV light. Sunlight works best on sunny days when there are no clouds blocking the sun’s rays, while lamps provide more consistent and controlled exposure.
Gloves, Brush, Plastic Wrap, etc.
When working with hydrogen peroxide and applying it onto the Commodore 64c, it is important to wear gloves to protect your hands from any potential harm. A brush can also come in handy for application and removal of excess mixture, as well as plastic wrap for wrapping around the Commodore 64c during exposure to aid in even distribution of Retrobright mixture.
Mixing Container
You will need a mixing container such as a plastic bowl or container with an air-tight lid. After creating the Retrobright mixture, it is important to keep it in an air-tight container to prevent evaporation of the hydrogen peroxide and xanthan gum or cornstarch mixture.
This will ensure that the Retrobright mixture remains effective for future Retrobrighting projects. By gathering all of these materials beforehand, you will be well-prepared to begin the Retrobrighting process and successfully restore the appearance of your Commodore 64c.
Preparing the Mixture
Mixing hydrogen peroxide with xanthan gum or cornstarch to create a gel-like substance
So you’ve got all of your materials ready, and now it’s time to prepare the Retrobright mixture. The key ingredient here is hydrogen peroxide, but simply applying hydrogen peroxide onto the yellowed parts of your Commodore 64c won’t do much. You need to mix it with either xanthan gum or cornstarch to create a gel-like substance that will stick onto the surface and work its magic.
But why these specific additives? Well, xanthan gum is commonly used in food products as a thickener and stabilizer.
It’s also used in cosmetic products because of its ability to hold water and improve texture. Cornstarch, on the other hand, is a more accessible alternative that can be found in most grocery stores.
To prepare the mixture, you’ll need 30% hydrogen peroxide and either xanthan gum or cornstarch. Add one tablespoon of xanthan gum or cornstarch into a container (ideally not metal) and slowly add hydrogen peroxide while stirring until you reach a gooey consistency.
Applying the mixture onto the yellowed parts of the Commodore 64c
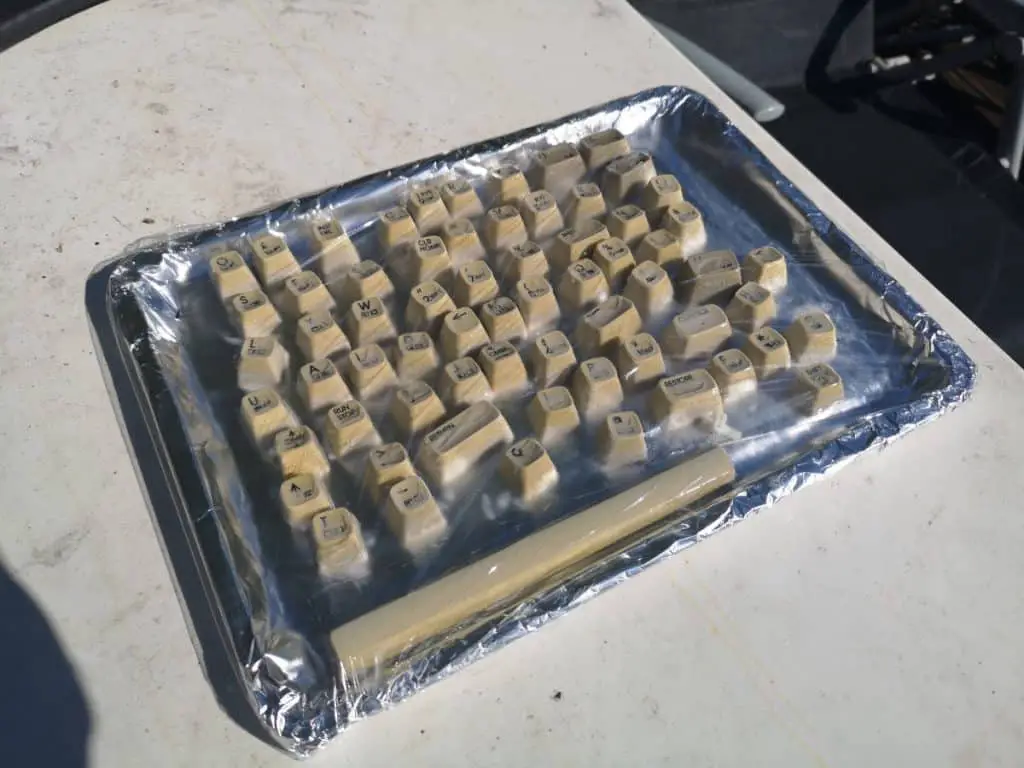
Now that you have your Retrobright mixture ready, it’s time to apply it onto your Commodore 64c! Put on some gloves for protection and use a brush to apply an even layer of Retrobright onto all yellowed areas.
Be sure not to cover any logos, stickers or other delicate parts that could be damaged during this process. If you’re only working on one small area at a time such as keys or badges on top of keys then wrap each piece in plastic wrap after applying Retrobright mix so it doesn’t dry out before you move onto the next area.
Once you’ve applied Retrobright to all of the yellowed areas, it’s time to move onto the next step: exposure to UV light. We’ll cover that in the next section.
Exposure to UV Light
Using Sunlight or a UV Lamp
Now that you’ve applied the Retrobright mixture onto the yellowed plastic parts of your Commodore 64c, it’s time to expose it to UV light. The easiest way to do this is by placing your Commodore 64c under direct sunlight. If you have access to a UV lamp, that will work too.
Keep in mind that the exposure process can take several hours, and it’s important to rotate the device every hour for even exposure. When using sunlight, choose a sunny day and find an area where your Commodore 64c can receive direct sunlight for several hours.
If possible, set up a timer so you can keep track of how long it has been exposed. If you live in an area where there is little sun or during seasons when there is less daylight, using a UV lamp could be more practical.
If you are using a UV lamp, make sure the light source is pointed directly at your Commodore 64c and make sure it’s not too close or too far away from the device. The ideal distance between the lamp and your Commodore 64c should be about one foot away from each other.
Rotating Your Commodore 64c
To ensure even exposure during Retrobrighting process, rotating your Commodore 64c every hour is highly recommended. This means flipping it over on another side or turning it around so that all sides get equal exposure time.
This method is important because if parts of the device are left unexposed and others receive prolonged exposure, uneven whitening may occur causing discoloration patterns around corners or edges. Another way to ensure even exposure without rotating your device: place mirrors strategically around it so that every angle receives reflected light rays as well!
Whether you choose to use natural sunlight or a UV lamp, exposing your Commodore 64c to UV light is the key element in the Retrobrighting process. It’s essential to rotate your device every hour so that all areas receive equal exposure time, and this will ensure that the retrobrightening process is even and effective. By following these simple steps, you can bring new life back into your beloved Commodore 64c and return it to its original splendor without having to spend a lot of money on replacement parts.
Cleaning and Finishing Touches
Removing Excess Retrobright Mixture with Water and a Brush
After letting the Commodore 64c soak in the Retrobright mixture and UV light, it’s time to clean off excess gel with water and a brush. A toothbrush works well for cleaning out small crevices and corners, while a soft-bristled brush can be used for larger areas.
Be sure to use gloves during this step to avoid skin irritation from the Retrobright mixture. Start by running water over the surface of the Commodore 64c to moisten it.
Then, using circular motions, gently scrub away any remaining gel until it has been completely removed. It may take some time depending on how much yellowing there was before you began.
When you are satisfied that all of the gel has been removed, rinse off the entire area again with fresh water. Make sure to remove any traces of Retrobright mixture residue left behind by running your hand over it or using a damp cloth.
Drying Off The Commodore 64c
Once you’ve cleaned off all traces of Retrobright mixture from your Commodore 64c, give it ample time to dry thoroughly before moving on to applying a protective coating. Use either a clean cloth or paper towel to pat down excess water droplets from surfaces and corners.
It’s important to completely dry everything before continuing because any remaining moisture can cause discoloration or damage when applying protective coatings like silicone spray or waxing agents. Depending on weather conditions such as humidity levels in your environment, drying may take anywhere from two hours up to overnight.
Applying Protective Coating
After completing both dryings thoroughly, apply a coat of protectant onto your Commodore 64c’s surface as soon as possible post-cleaning. This will help protect the plastic from UV light exposure and prevent further yellowing in the future.
There are several different types of protectants to choose from, but silicone spray is a good option for this task. Be sure to apply it evenly with a clean cloth and avoid over-applying or leaving any excess residue.
Apply lightly across all surfaces of your Commodore 64c, following the instructions on the can. Once applied, let it dry completely before moving or handling your computer again.
Removing Stains
If there are still stains visible on your Commodore 64c after Retrobrighting and cleaning, don’t worry! There are solutions to get rid of them too. For mild discoloration use baking soda solution (water and baking soda) with a soft-bristled brush.
It provides gentle scrubbing action that will hopefully remove the remaining stains without damaging any delicate parts such as logos or stickers. For more stubborn blemishes like deep scuffs or scratches that have caused chips in paint pigment, you may need to resort to using specialty polishers like Meguiars PlastX Clear Plastic Cleaner & Polish or Novus Plastic Polish #2 which can restore clarity to scratched plastics by removing any fine scratches on surfaces while smoothing out deeper ones.
Tips and Tricks
Avoiding damage to logos, stickers, or other delicate parts during Retrobrighting process
During the Retrobrighting process, it’s essential to be cautious of delicate parts such as logos and stickers on your Commodore 64c. These components can easily get damaged when exposed to the Retrobright mixture or sunlight.
To prevent damage, you can use plastic wrap to cover these delicate parts before applying the Retrobright mixture. Alternatively, you can use a toothpick or Q-tip to apply the paste around these areas carefully.
It’s worth mentioning that tape is not a good option as it might leave a residue after removal. Another useful tip is to avoid rubbing or scrubbing the yellowed areas while cleaning off the excess Retrobright mixture.
Instead, use a soft brush along with water gently. This will maintain the integrity of your Commodore 64c and avoid any accidental damage.
Note that this method may not work for some types of plastics used in Commodore 64c models that have been produced in Hong Kong and China. If you are unsure about how your plastic will react to this solution, test it on an inconspicuous part of your device first.
Using alternative methods such as submerging in hydrogen peroxide solution for severe yellowing cases
If your Commodore 64c has severe yellowing issues that cannot be fixed by standard Retrobrighting methods, there are alternative methods you can try. One of these methods involves fully submerging your Commodore 64c in a shallow container filled with hydrogen peroxide solution for several hours.
The recommended concentration is between 10% and 20%, depending on how severe the yellowing is. The process involves taking apart your device carefully so that you can submerge the plastic parts only.
Once submerged, leave it in sunlight for a few hours to catalyze the process. After several hours, remove your device from the solution and rinse it thoroughly with water.
Avoid using any strong chemicals that could damage your Commodore 64c. Afterward, let it dry off completely before reassembling it.
Note that this method is not recommended for all types of plastics as some could react adversely to hydrogen peroxide. It’s crucial to do some research first or consult an expert before trying this method out.
Taking care of your Commodore 64c is essential if you want to preserve its functionality and aesthetic value. With these tips and tricks, Retrobrighting your device should be more manageable and effective, even for severe yellowing cases.
Conclusion
Retrobrighting is an essential process for restoring the color of a Commodore 64c. By following the steps outlined in this article and using the materials listed, you can restore your Commodore 64c to its original glory. The process is relatively easy, but it does require a bit of patience and attention to detail.
One common mistake people make during Retrobrighting is exposing their Commodore 64c to too much UV light. This can result in damage or discoloration of certain parts of the device.
Therefore, it’s crucial to follow the timing recommendations mentioned above. Another essential factor to keep in mind during Retrobrighting is safety.
Hydrogen peroxide can be hazardous if not handled correctly. Therefore, it’s crucial to wear gloves and take other necessary precautions while mixing or applying the retrobrite mixture.
If you’re hesitant about trying Retrobrighting on your own, there are many online communities dedicated to this topic where people share their experiences and provide support for those who need help or have questions. Retrobrighting isn’t just about restoring vintage electronics; it’s also about preserving history and culture.
The Commodore 64 was a revolutionary device that paved the way for modern computing as we know it today. By keeping these devices in good condition, we ensure that future generations can appreciate them as much as we do.
I hope this article has been informative and helpful in explaining how to retrobright a Commodore 64c properly. With a little bit of effort and time, you can restore your vintage electronics back to their former glory!