
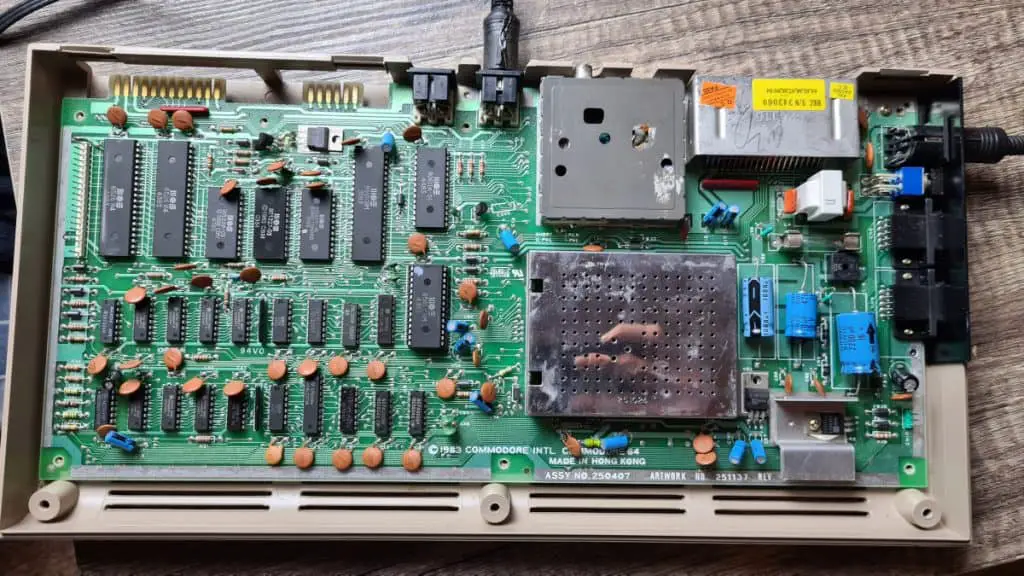
A Commodore 64 that lights its power LED but shows nothing but a black screen is one of the most common faults on these machines. The good news is that it can usually be narrowed down to a handful of parts with simple tests, and many of the likely culprits are socketed on early boards like the breadbin shown above.
Work through the steps below in order. The early ones are free and solve more cases than you might expect.
Step 1: Rule out the display and cable
Before opening anything, make sure it really is the computer. Try a different cable and, if possible, a different TV or monitor. With an RF lead, retune the TV carefully. A composite or S-Video cable to a monitor is a better test, as it removes tuning from the equation. Our guides to connecting a C64 to a TV and C64 video output cover the connections.
A true black screen (no border colour at all) is different from a blue screen with garbage, or a screen that flashes. Note exactly what you see, because it points to different parts.
Step 2: Remove everything plugged in
Unplug cartridges, the disk drive, user port devices and joysticks. A faulty cartridge or a short in an accessory can stop the machine starting. Then power on again with only the power supply and video connected.
Step 3: Check the power supply first
The original C64 power brick supplies 5V DC for the logic and 9V AC for other circuits. Old bricks are a known risk: as they age the 5V output can drift high, and an over-voltage supply can damage the C64’s chips. If yours is an original brick, stop using it until you have measured it with a multimeter, preferably under load.
- The 5V DC rail should be close to 5V. Treat anything well above about 5.25V as unsafe.
- If either output is missing, or the brick gets very hot, replace it.
A modern replacement C64 power supply is a sensible investment for any machine you plan to use. Our C64 power supply guide explains the options. It is also worth checking the fuse on the motherboard.
Step 4: Look for obvious damage and reseat chips
With the machine unplugged, open the case and look for burnt components, corrosion or damaged tracks. On boards with socketed chips, gently reseat each socketed chip, as oxidised sockets can cause intermittent black screens. Take care to keep every chip the right way round.
Step 5: Run a Dead Test cartridge
The single most useful tool for a black screen is a C64 Dead Test cartridge. It is an Ultimax-type cartridge that bypasses the normal ROMs and runs a minimal test with very few parts working. It mainly needs the 6510 CPU, the PLA, the VIC-II video chip and the clock and reset circuits.
What it shows tells you a lot:
- Nothing at all, even with the Dead Test fitted: suspect the power, the clock or reset circuit, the CPU, the PLA or the VIC-II.
- The screen flashes a number of times, then stops: this points to a RAM fault. The number of flashes identifies the data bit, and so the RAM chip, but which chip it is depends on the board revision, so look it up on a flash-code chart for your board.
- The test runs and passes: the core parts work, so the fault is more likely in the ROMs or another part of normal startup.
Step 6: Interpreting the result
| Symptom | Likely suspects |
|---|---|
| Black screen, Dead Test also shows nothing | Power, PLA, VIC-II, CPU, clock or reset |
| Black screen, Dead Test flashes | RAM chip indicated by the flash count |
| Black screen, Dead Test passes | Kernal ROM or PLA |
| Blue screen, normal border, no text | BASIC ROM |
| Corrupt characters, colours normal | Character ROM |
The PLA is one of the most common failures on the C64, and modern replacement boards are available. The Kernal ROM is the most likely of the three ROMs to fail, and a black screen is its usual symptom. If an Ultimax cartridge works but the machine will not boot normally, a bad Kernal is a strong possibility.
Step 7: Swap, do not guess
The fastest way to confirm a fault is to swap a suspect chip with a known-good one, if you have a donor board and the chips are socketed. If they are soldered in, cut the legs of the suspect chip, remove them one at a time, and fit a socket. See our guides to desoldering a chip and clearing stubborn solder from holes. A chip extraction tool and a logic probe are useful for this kind of work.
When to stop
If the Dead Test shows nothing and you have already replaced the power supply and checked the PLA, the remaining faults need an oscilloscope or logic analyser to trace. At that point it may be worth asking a specialist repairer. But most black screen C64s come back to life with a new power supply, a reseated chip, a replacement PLA or one faulty RAM chip.
FAQ
Why does my Commodore 64 turn on but show a black screen?
The most common causes are a faulty power supply, a bad PLA, a failed VIC-II, a RAM chip fault or a bad Kernal ROM. A Dead Test cartridge helps you tell them apart.
Can a bad power supply damage a Commodore 64?
Yes. Ageing original bricks can output too much voltage on the 5V rail, which can damage the chips. Measure an original supply before using it, or replace it with a modern one.
What does a C64 Dead Test cartridge do?
It is a diagnostic cartridge that runs with the normal ROMs bypassed. It tests the core logic and RAM, and reports RAM faults with a series of screen flashes.
Is the PLA the most common C64 fault?
It is one of the most common causes of a black screen, along with RAM and the power supply. Replacement PLAs and modern PLA substitutes are widely available.