Introduction
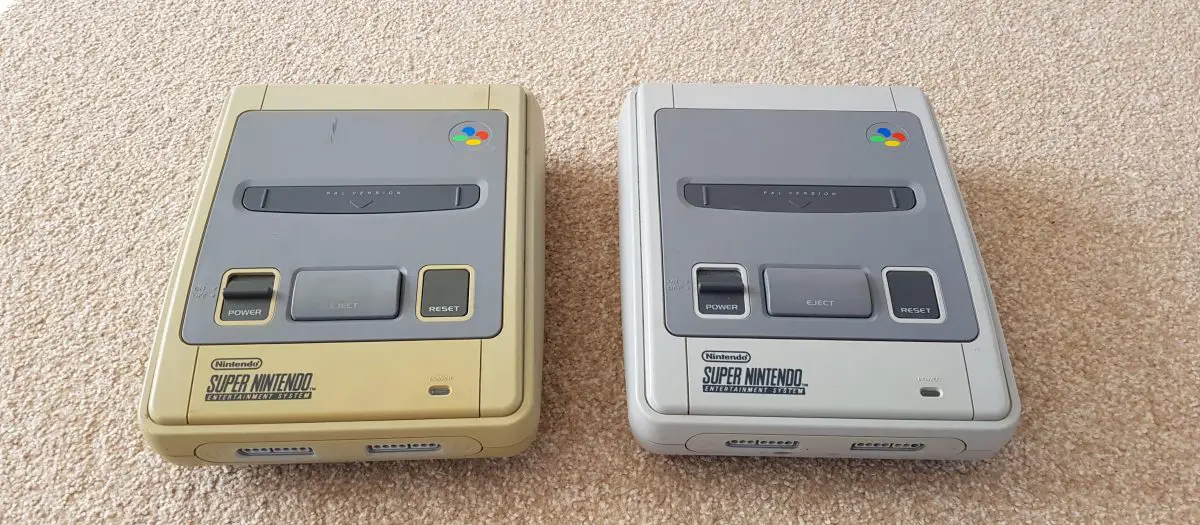
The Super Nintendo Entertainment System (SNES) remains one of the most beloved gaming consoles of all time. However, many SNES units from the early 1990s have developed an unsightly yellow discoloration over the decades.
This yellowing issue affects not only the aesthetic appeal of your retro console but can also impact its collectible value. Fortunately, there’s a proven scientific method called “retrobrite” that can restore your yellowed SNES to its original pristine condition.
A yellowed SNES console showing the typical discoloration that affects many retro gaming systems
This comprehensive guide will walk you through the entire SNES restoration process, from understanding the science behind plastic yellowing to achieving professional-grade results. Whether you’re a retro gaming enthusiast or simply want to restore a childhood console, this step-by-step tutorial will help you achieve excellent results safely.
The retrobrite method has been used successfully by thousands of retro gaming enthusiasts worldwide. With proper preparation, materials, and technique, you can expect to see dramatic improvements in your console’s appearance.
What Causes Yellowing in Retro Consoles?
The Science Behind Plastic Discoloration
The yellowing of SNES consoles and other retro electronics is primarily caused by a chemical reaction involving flame retardants added to the plastic during manufacturing. Most notably, bromine-based flame retardants are the main culprits behind this discoloration.
When ABS (Acrylonitrile Butadiene Styrene) plastic containing these flame retardants is exposed to ultraviolet light, heat, and oxygen over extended periods, a photochemical reaction occurs. This reaction breaks down the molecular structure of the flame retardants, creating yellow and brown compounds.

Side-by-side comparison showing the dramatic difference between yellowed and original-colored SNES plastic
Environmental Factors Contributing to Yellowing
Several environmental factors accelerate the yellowing process in retro consoles:
- UV Light Exposure: Direct sunlight and fluorescent lighting contain UV rays that trigger the chemical breakdown
- Heat Exposure: High temperatures accelerate chemical reactions, speeding up the yellowing process
- Oxygen Exposure: Oxidation reactions contribute to the degradation of flame retardants
- Cigarette Smoke: Tar and nicotine compounds can accelerate and intensify yellowing
- Age: Simply the passage of time allows these chemical reactions to occur gradually
- Storage Conditions: Humid environments and poor ventilation can worsen the effects
Why Some Consoles Yellow More Than Others
Not all SNES consoles yellow at the same rate or to the same extent. This variation occurs due to several factors related to manufacturing and storage conditions.
Different production batches used varying concentrations of flame retardants. Some manufacturing facilities mixed flame retardants more thoroughly than others, leading to uneven distribution throughout the plastic.
Interesting Fact: Some SNES consoles show uneven yellowing patterns, with certain sections more discolored than others. This occurs when different plastic components were manufactured at different times or with different chemical formulations.
The storage environment plays a crucial role in yellowing development. Consoles stored in basements, attics, or near windows typically show more severe discoloration than those kept in climate-controlled environments away from direct light.
The Molecular Process of Retrobrite
The retrobrite process works by using hydrogen peroxide (H₂O₂) activated by UV light to reverse the chemical changes that cause yellowing. When hydrogen peroxide breaks down, it releases oxygen atoms that can break apart the yellow compounds.
This oxidation process essentially “bleaches” the yellowed plastic back toward its original color. The UV light acts as a catalyst, accelerating the breakdown of hydrogen peroxide and making the process more efficient.
Materials Needed for Retrobrite
Essential Chemicals and Solutions
The success of your SNES restoration project depends heavily on using the correct materials in proper concentrations. Here’s a comprehensive list of everything you’ll need for the retrobrite process.

Complete materials setup for retrobrite process including hydrogen peroxide, UV lights, and safety equipment
| Material | Concentration/Type | Quantity Needed | Purpose |
|---|---|---|---|
| Hydrogen Peroxide | 3% or 6% solution | 500ml – 1L | Primary bleaching agent |
| Hair Developer Cream | 40 volume (12%) | 200-300ml | Alternative H₂O₂ source with thickening agents |
| Oxy Laundry Booster | Sodium Percarbonate | 2-3 tablespoons | Additional oxygen source |
| Xanthan Gum | Food grade powder | 1-2 teaspoons | Thickening agent for gel method |
| Glycerin | 99% pure | 1 teaspoon | Prevents mixture from drying out |
Tools and Equipment Required
Proper tools are essential for safely disassembling your SNES console and achieving professional results. Many of these tools are console-specific and may require special ordering.

Specialized tool kit for Nintendo console disassembly including security bits and precision screwdrivers
- Security Screwdrivers:
- 4.5mm Nintendo security bit (gamebit)
- Triwing screwdriver for internal screws
- Phillips head screwdrivers (various sizes)
- UV Light Sources:
- UV-A blacklight bulbs (315-400nm wavelength)
- UV LED strips or panels
- Natural sunlight (weather permitting)
- Safety Equipment:
- Chemical-resistant gloves (nitrile or vinyl)
- Safety glasses or goggles
- Well-ventilated workspace or respirator mask
- Application Tools:
- Foam brushes for even application
- Plastic wrap or aluminum foil
- Measuring cups and spoons
- Mixing bowls (glass or plastic)
Workspace Setup Requirements
Creating the proper workspace is crucial for both safety and effectiveness. Your retrobrite setup should accommodate UV light exposure while maintaining safe chemical handling procedures.
Choose a well-ventilated area, preferably outdoors or in a garage with open doors. If working indoors, ensure adequate airflow and consider using a fan to disperse chemical vapors.
Pro Tip: Set up your workspace near a water source for easy cleanup and emergency rinsing. Keep a spray bottle filled with water nearby to quickly dilute any spilled chemicals.
Cost Breakdown and Sourcing
| Item Category | Estimated Cost | Best Sources | Notes |
|---|---|---|---|
| Chemicals | $15-25 | Beauty supply stores, pharmacies | Hair developer cream often most cost-effective |
| Tools | $20-40 | eBay, Amazon, specialty retailers | One-time investment for multiple projects |
| UV Lights | $30-60 | Hardware stores, online retailers | LED strips more energy efficient |
| Safety Equipment | $10-20 | Hardware stores, pharmacies | Essential for safe operation |
Step-by-Step Cleaning and Whitening Process
Phase 1: Console Disassembly
Before beginning the retrobrite process, you must carefully disassemble your SNES console to access the plastic shell components. This step requires patience and attention to detail to avoid damaging internal components.
Step 1: Power down the console completely and disconnect all cables. Allow the system to cool if it has been used recently.
Step 2: Turn the console upside down and locate the six screws on the bottom panel. These require a 4.5mm Nintendo security bit (gamebit) to remove.
Step 3: Carefully remove the bottom screws and set them aside in a small container. Keep track of screw lengths as some may be different sizes.
Step 4: Gently separate the top and bottom shell halves. Be careful not to force them apart, as there may be internal connections still attached.
Step 5: Document the internal layout with photos before disconnecting any cables. This will help during reassembly.
Once disassembled, you’ll have access to the plastic shell pieces that require treatment. Typically, only the top shell shows significant yellowing, but inspect all plastic components for discoloration.
Important: Handle internal components with care. The cartridge connector and other electronic components are delicate and expensive to replace if damaged.
Phase 2: Pre-Treatment Cleaning
Before applying retrobrite solution, thoroughly clean all plastic components to remove dirt, grease, and other contaminants that could interfere with the whitening process.
Use warm soapy water and a soft cloth to clean each plastic piece. Pay special attention to areas around ventilation grilles and button recesses where dirt commonly accumulates.
- Rinse thoroughly with clean water to remove all soap residue
- Dry completely with lint-free cloths
- Allow pieces to air dry for at least 30 minutes
- Inspect for any remaining dirt or stains
Phase 3: Retrobrite Solution Preparation
The effectiveness of your restoration depends on preparing the retrobrite solution correctly. There are several proven formulations, each with specific advantages for different situations.

The cream and wrap method showing proper application technique and plastic wrap coverage
Method 1: Liquid Submersion Formula
This method works well for smaller components that can be fully submerged in solution.
- Mix 500ml of 3% hydrogen peroxide with 2 tablespoons of Oxy laundry booster
- Stir until completely dissolved
- Add 1 teaspoon of glycerin to prevent rapid evaporation
- Use immediately after mixing for best results
Method 2: Gel Application Formula
The gel method provides better control and prevents solution from running off vertical surfaces.
- Combine 200ml hair developer cream (40 volume) with 1 tablespoon Oxy booster
- Add 1/2 teaspoon xanthan gum while stirring continuously
- Mix until smooth and gel-like consistency is achieved
- Allow mixture to sit for 5 minutes before application
Phase 4: Application Process
Proper application technique ensures even coverage and optimal results. Work in a well-ventilated area and wear appropriate safety equipment throughout this process.
Step 1: Apply retrobrite solution evenly across all yellowed surfaces using a foam brush. Maintain consistent coverage thickness of approximately 2-3mm.
Step 2: For gel method, wrap treated pieces in plastic wrap to prevent drying. For liquid method, ensure pieces are fully submerged in solution.
Step 3: Position UV lights 6-12 inches away from treated surfaces. Closer positioning increases treatment speed but may cause uneven results.
Step 4: Monitor progress every 30-60 minutes. Most treatments require 2-8 hours depending on yellowing severity and UV intensity.
Phase 5: Monitoring and Progress Assessment
Regular monitoring prevents over-treatment and ensures optimal results. The retrobrite process is gradual, with most improvements becoming visible after the first hour of treatment.
Look for these positive indicators during treatment:
- Gradual lightening of yellow areas
- More uniform color across the surface
- Reduction in color contrast between yellowed and non-yellowed areas
| Treatment Time | Expected Progress | Action Required |
|---|---|---|
| 0-1 hours | Little visible change | Continue monitoring |
| 1-3 hours | Slight lightening begins | Check solution hasn’t dried |
| 3-6 hours | Noticeable improvement | Assess if more time needed |
| 6-8 hours | Near-optimal results | Consider stopping treatment |
| 8+ hours | Diminishing returns | Stop to prevent damage |
Warning: Extended treatment beyond 12 hours may cause plastic degradation, surface roughening, or brittleness. Always err on the side of caution.
Phase 6: Post-Treatment Cleanup
Once you’re satisfied with the whitening results, thoroughly clean all treated components to remove retrobrite residue and prepare them for reassembly.
Rinse each piece under cool running water for at least 2 minutes. Use a soft brush to remove any remaining gel or solution from textured surfaces and crevices.
- Wash with mild soap and water to neutralize any remaining chemicals
- Rinse thoroughly multiple times
- Dry completely with lint-free cloths
- Allow air drying for at least 1 hour before reassembly
Phase 7: Console Reassembly
Reassemble your SNES console in reverse order of disassembly. Take your time to ensure all components are properly aligned and secured.
Reference the photos you took during disassembly to verify correct cable connections and component placement. Test the console’s functionality before fully closing the case.
Quality Check: Before final assembly, inspect all treated surfaces under good lighting. Minor imperfections can often be addressed with additional spot treatment if necessary.
Safety Tips and Precautions
Chemical Safety Guidelines
Working with hydrogen peroxide and other retrobrite chemicals requires strict adherence to safety protocols. These chemicals can cause burns, respiratory irritation, and other health issues if handled improperly.
Always wear chemical-resistant gloves when handling retrobrite solutions. Nitrile gloves provide excellent protection and are available at most pharmacies and hardware stores.
Critical Safety Warning: Never mix retrobrite chemicals with other cleaning products, especially those containing ammonia or acids. Such combinations can create dangerous chemical reactions.
Personal Protective Equipment (PPE)
Proper PPE is non-negotiable when working with retrobrite solutions. The following equipment should be worn throughout the entire process:
- Eye Protection: Safety glasses or goggles to prevent chemical splashes
- Hand Protection: Chemical-resistant gloves changed regularly
- Respiratory Protection: Work in well-ventilated areas or use appropriate masks
- Clothing Protection: Wear old clothes or aprons that can be discarded if contaminated
UV Light Safety Considerations
UV lights used in the retrobrite process can cause skin and eye damage with prolonged exposure. Treat UV light sources with the same caution you would use for direct sunlight.
Never look directly at UV bulbs or LED arrays while they’re operating. Even brief exposure can cause eye damage similar to “welder’s flash.”
- Position UV lights to avoid direct exposure to skin and eyes
- Use timers to limit exposure duration
- Wear UV-blocking sunglasses when checking progress
- Keep UV light setup away from areas where people or pets might be exposed
Workspace Ventilation Requirements
Adequate ventilation is crucial for safely dispersing chemical vapors released during the retrobrite process. Hydrogen peroxide decomposition can release oxygen, while other chemicals may produce irritating fumes.
Outdoor workspaces provide ideal ventilation, but garage or basement areas with open doors and fans can also work effectively.
Ventilation Checklist:
- Fresh air circulation throughout treatment duration
- No accumulation of chemical odors
- Ability to quickly evacuate area if needed
- Access to emergency water source
Emergency Procedures
Despite careful precautions, chemical accidents can occur. Knowing proper emergency responses can prevent minor incidents from becoming serious injuries.
For skin contact with retrobrite solutions, immediately flush the affected area with cool water for at least 15 minutes. Remove contaminated clothing and seek medical attention if irritation persists.
If chemicals contact eyes, flush immediately with clean water for at least 20 minutes while holding eyelids open. Seek immediate medical attention even if initial irritation seems minor.
Chemical Storage and Disposal
Proper storage and disposal of retrobrite chemicals protects both your household and the environment. Never pour leftover solutions down drains or dispose of them in regular trash.
- Store chemicals in original containers with proper labeling
- Keep solutions away from heat sources and direct sunlight
- Dispose of expired chemicals through hazardous waste programs
- Never mix different chemical products for storage
Before and After Examples
Dramatic Transformation Results
The retrobrite process can produce remarkable improvements in yellowed console appearance. Most SNES restoration projects show 70-90% improvement in color matching to original specifications.
Severely yellowed consoles that appear almost brown can often be restored to near-original gray coloration. Even consoles with extreme discoloration typically show significant improvement, though multiple treatment cycles may be necessary.
Realistic Expectations
While retrobrite can produce excellent results, it’s important to maintain realistic expectations about the process limitations and potential outcomes.
Some yellowing may be permanent, especially in cases where plastic degradation has occurred beyond surface-level discoloration. Additionally, different plastic formulations respond differently to treatment.
- Excellent Results (80-95% improvement): Light to moderate yellowing with recent onset
- Good Results (60-80% improvement): Moderate yellowing with some age-related degradation
- Fair Results (40-60% improvement): Heavy yellowing with significant plastic degradation
- Limited Results (20-40% improvement): Extreme yellowing with structural plastic changes
Common Success Factors
Several factors consistently correlate with better retrobrite results across different restoration projects:
| Success Factor | Impact Level | Description |
|---|---|---|
| Yellowing Severity | High | Lighter yellowing responds better than severe discoloration |
| Plastic Condition | High | Smooth, intact surfaces achieve better results |
| UV Light Quality | Medium | Proper wavelength UV sources improve effectiveness |
| Treatment Duration | Medium | Adequate exposure time within safe limits |
| Solution Freshness | Medium | Newly mixed solutions work more effectively |
Long-Term Results and Durability
Retrobrite results are generally stable when consoles are stored properly after treatment. However, the same environmental factors that caused original yellowing can affect treated plastic over time.
Most successfully treated consoles maintain their restored appearance for 5-10 years under normal storage conditions. Proper storage away from UV light and heat sources significantly extends result durability.
Maintenance Tip: Store restored consoles in cool, dark environments when not in use. Consider UV-filtering display cases if showcasing your collection in well-lit areas.
Troubleshooting Common Issues
Uneven Whitening Results
Uneven whitening is one of the most common issues encountered during retrobrite treatment. This problem typically stems from inconsistent solution application or uneven UV light exposure.
To address uneven results, identify the specific areas that need additional treatment and apply retrobrite solution only to those sections for shorter duration treatments.
No Visible Improvement
If no improvement is visible after 4-6 hours of treatment, several factors may be responsible:
- Insufficient UV light intensity or incorrect wavelength
- Expired or improperly mixed retrobrite solution
- Extremely severe yellowing requiring longer treatment
- Plastic contamination preventing chemical action
Surface Texture Changes
Overexposure to retrobrite solutions can cause plastic surface roughening or texture changes. This issue is typically irreversible and emphasizes the importance of monitoring treatment progress.
If texture changes occur, discontinue treatment immediately and thoroughly rinse affected areas. Minor texture changes may improve with gentle polishing using plastic-safe compounds.
Conclusion and Maintenance Tips
Achieving Professional Results
Successfully restoring a yellowed SNES console requires patience, proper materials, and attention to safety protocols. The retrobrite process, when executed correctly, can return your vintage console to near-original appearance.
Remember that restoration is both an art and a science. Each console presents unique challenges, and developing skill with the retrobrite process takes practice and experience.
Preserving Your Restoration
Once you’ve achieved excellent results with your SNES restoration, proper storage and handling will preserve the improvement for years to come.
- Store in cool, dry environments away from direct light
- Use UV-filtering display cases for showcase storage
- Handle with clean hands to avoid transferring oils and contaminants
- Perform regular gentle cleaning with appropriate methods
The satisfaction of successfully restoring a yellowed retro console extends far beyond aesthetic improvement. You’re preserving gaming history and ensuring these classic systems remain functional and attractive for future generations of gamers to enjoy.
Final Reminder: Always prioritize safety when working with chemicals and UV light sources. The techniques described in this guide have been used successfully by thousands of retro gaming enthusiasts, but individual results may vary based on console condition and environmental factors.
With proper preparation, materials, and technique, your yellowed SNES console can be transformed from an unsightly reminder of age into a beautiful representation of gaming history at its finest.