Transform your forgotten laptop into a powerhouse of nostalgia. That dusty old laptop sitting in your closet doesn’t have to be electronic waste. With the right approach, you can repurpose laptop hardware into a dedicated retro gaming pc that rivals commercial solutions.
This comprehensive guide will walk you through every step of creating your own gaming console setup. From determining minimum specifications to optimizing performance, we’ll cover everything you need to know about breathing new life into aging hardware.
Why Convert Your Old Laptop?
The benefits of converting an old laptop emulator system extend far beyond simple nostalgia. Modern commercial retro consoles often come with limited game libraries and restricted customization options. Your laptop conversion offers unlimited potential.
Cost-effectiveness plays a major role in this decision. Instead of spending hundreds on dedicated retro hardware, you’re utilizing equipment you already own. The performance capabilities of even older laptops often exceed those of popular retro gaming devices.
- Extensive game library support – Access thousands of games across multiple platforms
- Superior processing power – Handle demanding emulation tasks smoothly
- Built-in display and controls – Portable gaming solution ready out of the box
- Customization freedom – Install any emulator, frontend, or operating system
- Network connectivity – Online multiplayer and game updates
- Storage expansion – Add external drives for massive game collections
Minimum Specs Required
Before diving into your old laptop emulator project, understanding hardware requirements prevents frustration later. Different gaming systems demand varying levels of computational power, and knowing these limits helps set realistic expectations.
The good news is that most laptops from the last 15 years can handle classic console emulation effectively. However, more demanding systems like PlayStation 2, GameCube, or newer consoles require significantly more processing power.
Essential Hardware Components
Processor (CPU): The heart of your retro gaming pc determines which systems you can emulate successfully. Most retro consoles rely heavily on single-core performance rather than multiple cores.
Intel Core 2 Duo or AMD equivalent processors represent the absolute minimum for basic emulation. However, Core i3 or better processors from 2010 onwards provide much better results across all emulated systems.Console Generation Minimum CPU Recommended CPU Performance Notes 8-bit/16-bit (NES, SNES, Genesis) Pentium 4 2.0GHz Core 2 Duo 2.4GHz Perfect performance on any modern laptop 32-bit (PlayStation, N64, Saturn) Core 2 Duo 2.0GHz Core i3 2.5GHz Some N64 games require higher clock speeds Early 128-bit (Dreamcast, PS2, GameCube) Core i3 3.0GHz Core i5 3.2GHz+ PS2 emulation particularly demanding Handheld (Game Boy, DS, PSP) Core 2 Duo 1.8GHz Core i3 2.0GHz 3DS requires modern i5 or better
Memory (RAM): Emulation software and game ROMs consume varying amounts of system memory. While older systems require minimal RAM, running multiple emulators or frontend software increases requirements substantially.
Four gigabytes represents the practical minimum for a functional gaming console setup. Eight gigabytes or more provides comfortable headroom for demanding emulators and background processes.
- 2GB RAM: Basic 8-bit and 16-bit emulation only
- 4GB RAM: Comfortable for most retro systems up to PlayStation 1
- 8GB RAM: Handles demanding emulators like PS2, GameCube smoothly
- 16GB+ RAM: Future-proof for any emulation needs
Graphics and Display Considerations
Integrated graphics solutions handle most retro gaming requirements without issues. However, newer emulators utilize GPU acceleration for enhanced visual effects and performance improvements.
Dedicated graphics cards from NVIDIA or AMD provide significant advantages when using advanced shader effects, upscaling filters, and demanding emulators. Even entry-level discrete GPUs outperform integrated solutions substantially.
Pro Tip: Many emulators offer software rendering modes that work perfectly with integrated graphics. Don’t let the lack of a dedicated GPU discourage your retro gaming pc project.
| Graphics Solution | Suitable Emulators | Enhancement Features | Limitations |
|---|---|---|---|
| Intel HD Graphics 3000+ | All 2D systems, basic 3D | Basic upscaling, some shaders | Limited enhancement options |
| AMD APU Graphics | Most systems including PS2 | Good shader support, upscaling | Performance varies by model |
| Dedicated GPU (GT 730+) | All emulated systems | Full enhancement suite available | Increased power consumption |
Storage Requirements and Options
[Image: Various storage devices – HDD, SSD, USB drives with game collections]
Alt text: Comparison of storage options for retro gaming including hard drives and flash storage
Storage capacity requirements depend entirely on your game collection ambitions. Individual ROM files range from kilobytes for early arcade games to gigabytes for disc-based systems like PlayStation 2.
Solid-state drives provide faster loading times and improved system responsiveness compared to traditional hard drives. However, cost per gigabyte considerations make large traditional drives attractive for massive game libraries.
- 120GB SSD: Operating system plus curated game selection
- 500GB Storage: Comprehensive collection of cartridge-based systems
- 1TB+ Storage: Complete libraries including disc-based systems
- External Storage: USB drives for additional capacity and portability
Best Emulators for Laptops
Selecting the right emulation software makes the difference between frustrating compatibility issues and smooth gaming experiences. The best emulators balance accuracy, performance, and user-friendly features while maintaining active development communities.
This section covers proven emulators that work exceptionally well on laptop hardware. Each recommendation includes specific configuration tips and performance expectations for typical laptop specifications.
Multi-System Emulation Suites
RetroArch stands as the most comprehensive emulation platform available today. This frontend utilizes individual “cores” for different systems, providing consistent interfaces and advanced features across all supported platforms.
The learning curve can be steep initially, but RetroArch’s unified approach simplifies management of large game collections. Built-in shader systems, netplay functionality, and save state management work across all emulated systems.
- Advantages: Unified interface, extensive customization, regular updates
- Best for: Users wanting single solution for multiple systems
- Laptop performance: Excellent with proper core selection
- Difficulty level: Moderate to advanced configuration required
OpenEmu (Mac only) provides an elegant alternative for MacBook users. The polished interface and automatic game organization make it incredibly user-friendly compared to other solutions.
While limited to macOS, OpenEmu’s seamless integration and beautiful presentation make it the preferred choice for Mac-based retro gaming pc builds. Controller support and game library management work flawlessly out of the box.
Individual System Emulators
| Gaming System | Recommended Emulator | Laptop Performance | Special Features |
|---|---|---|---|
| Nintendo Entertainment System | Mesen | Perfect on any laptop | Cycle-accurate, debugging tools |
| Super Nintendo | Snes9x | Flawless performance | Excellent compatibility, active development |
| Sega Genesis/Mega Drive | Gens KMod | Perfect compatibility | Enhanced audio, save states |
| Game Boy / Game Boy Color | SameBoy | Minimal resource usage | High accuracy, Game Boy Camera support |
| Game Boy Advance | mGBA | Excellent performance | Fast forwarding, rewind features |
| Nintendo 64 | Project64 | Good on Core i3+ | Plugin system, texture packs |
| Sony PlayStation | DuckStation | Great performance | PGXP enhancement, upscaling |
| Sony PlayStation 2 | PCSX2 | Requires Core i5+ | Widescreen patches, texture filtering |
| Nintendo GameCube | Dolphin | Demanding, needs good CPU | HD output, texture packs |
| Sega Dreamcast | Flycast | Moderate requirements | Widescreen support, enhanced graphics |
Arcade and MAME Emulation
Arcade emulation presents unique challenges due to the vast variety of hardware configurations used in coin-operated machines. MAME (Multiple Arcade Machine Emulator) remains the gold standard for arcade authenticity.
Different MAME versions offer varying balances between accuracy and performance. Newer versions provide better accuracy but require more processing power, while older versions run smoothly on limited hardware.
Important: MAME ROM requirements change between versions. Ensure your ROM collection matches your chosen MAME version to avoid compatibility issues.
- MAME 0.78: Best for older laptops, excellent game compatibility
- Current MAME: Most accurate emulation, requires modern hardware
- FinalBurn Neo: Focused on popular arcade systems, good performance
- Kawaks: Specializes in Neo Geo and CPS systems
Handheld System Emulation
[Image: Various handheld gaming systems and their emulated versions on laptop screen]
Alt text: Laptop displaying multiple handheld console emulators running classic portable games
Handheld system emulation offers some of the most satisfying retro gaming experiences on laptops. The smaller screen resolutions and simpler hardware make these systems perfect candidates for older laptop hardware.
Many handheld emulators include features that enhance the original experience significantly. Screen filters can simulate authentic LCD effects, while fast-forward functions eliminate tedious grinding in RPG games.
- Nintendo DS: DeSmuME or melonDS for dual-screen gaming
- PlayStation Portable: PPSSPP with HD output capabilities
- Game Gear: Genesis Plus GX core in RetroArch
- Neo Geo Pocket: Mednafen with excellent compatibility
- Atari Lynx: Handy emulator for this rare system
Optimizing Performance on Older Hardware
Maximizing performance on aging laptop hardware requires systematic optimization across multiple areas. Even modest improvements in system efficiency can mean the difference between choppy gameplay and smooth emulation experiences.
This section focuses on practical techniques that provide measurable performance gains without requiring hardware modifications. Every optimization tip has been tested on various laptop configurations to ensure real-world effectiveness.
Operating System Optimization
Your choice of operating system significantly impacts available system resources for emulation. Lightweight Linux distributions often provide better performance than Windows on older hardware, though Windows offers broader software compatibility.
Windows users should disable unnecessary services and visual effects to free up system resources. Linux users can choose distributions specifically optimized for older hardware or gaming applications.
[Image: Side-by-side comparison of Windows vs Linux performance on old laptop]
Alt text: Performance comparison showing resource usage between Windows and Linux on retro gaming laptop
- Windows Optimization:
- Disable Windows Search indexing service
- Turn off visual effects and animations
- Uninstall unnecessary pre-installed software
- Set power plan to High Performance mode
- Disable automatic updates during gaming sessions
- Linux Alternatives:
- Ubuntu MATE for user-friendly lightweight experience
- Lubuntu for maximum performance on limited hardware
- RetroPie for dedicated gaming console experience
- Lakka for RetroArch-focused gaming system
Emulator-Specific Performance Tweaks
Each emulator offers specific settings that dramatically impact performance on older hardware. Understanding these options helps you find the optimal balance between visual quality and smooth gameplay.
Frame skipping, audio buffer adjustments, and rendering options provide the most significant performance improvements. However, these settings require careful tuning to avoid negatively impacting the gaming experience.
| Optimization Category | Setting Adjustments | Performance Impact | Quality Trade-off |
|---|---|---|---|
| Frame Skipping | Skip 1-2 frames when needed | High performance gain | Slight visual stuttering |
| Audio Buffer | Increase buffer size to 64-128ms | Reduces CPU load significantly | Minor audio latency increase |
| Video Rendering | Use software rendering | Better compatibility on old GPUs | Lower resolution options |
| Shader Effects | Disable all enhancement shaders | Major performance improvement | Loss of visual enhancements |
| Overclock Settings | Reduce emulated CPU speed | Moderate performance gain | Some games may run slower |
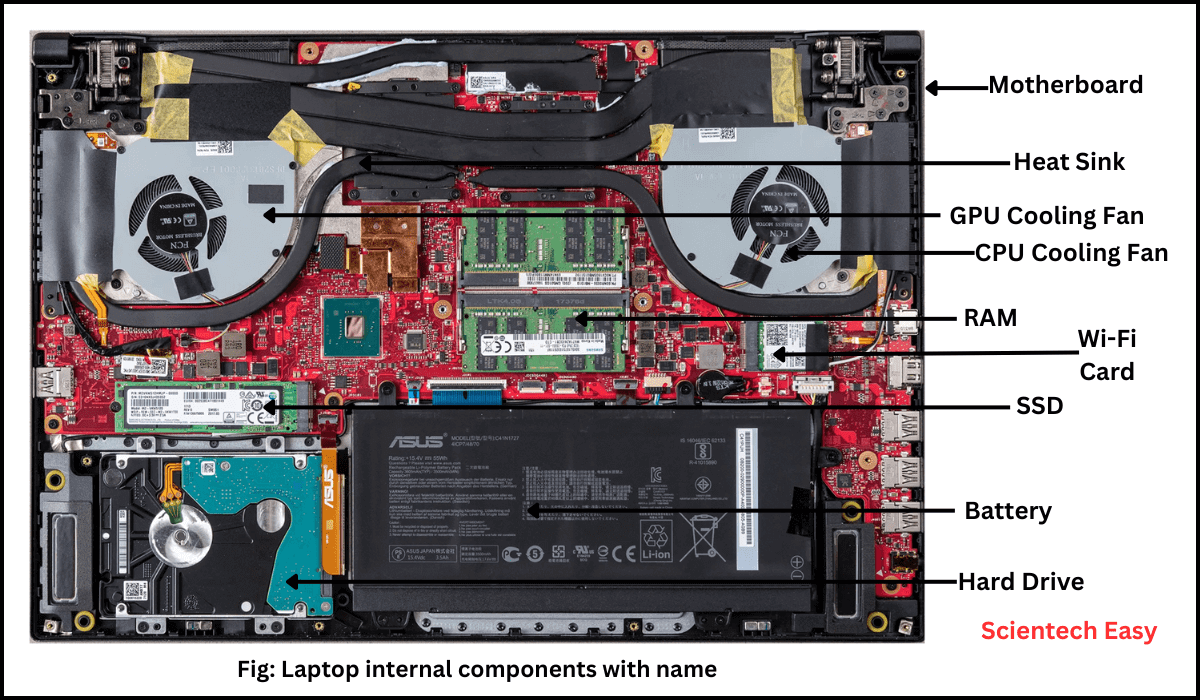
Hardware Maintenance and Upgrades
Physical maintenance of older laptops often provides surprising performance improvements. Dust accumulation, thermal paste degradation, and failing cooling systems create thermal throttling that severely limits performance.
Simple maintenance procedures can restore your laptop to near-original performance levels. More ambitious users might consider hardware upgrades that provide substantial improvements for minimal cost.
Maintenance Tip: Cleaning laptop fans and replacing thermal paste typically provides 10-20% performance improvements on laptops over 5 years old.
- Essential Maintenance:
- Clean dust from cooling vents and fans
- Replace thermal paste on CPU and GPU
- Check hard drive health and defragment if needed
- Test and clean RAM contacts
- Cost-Effective Upgrades:
- Add maximum supported RAM capacity
- Replace hard drive with SSD
- Upgrade to faster RAM if supported
- External GPU via Thunderbolt (newer laptops)
Power Management and Thermal Control

Proper power management prevents thermal throttling while maximizing performance during gaming sessions. Older laptops often suffer from degraded cooling systems that limit sustained performance significantly.
External cooling solutions and power management software provide additional control over system performance. These tools help maintain consistent frame rates during extended gaming sessions.
- Power Plan Optimization:
- Create custom high-performance power plan
- Set CPU minimum state to 100%
- Disable USB selective suspend
- Turn off hard drive sleep timers
- Thermal Management:
- Use laptop cooling pads for better airflow
- Monitor temperatures with HWiNFO64 or similar
- Undervolt CPU to reduce heat generation
- Limit maximum CPU frequency if overheating occurs
Installing Frontends and ROMs
Creating an attractive, user-friendly interface transforms your repurpose laptop project from a technical exercise into a polished gaming console setup. Frontend software organizes your game collection and provides console-like experiences that rival commercial products.
This section covers the most popular frontend options and provides step-by-step installation guidance. We’ll also address ROM management, legal considerations, and organization strategies for large game collections.
Popular Frontend Options
LaunchBox/Big Box represents the premium standard for game collection management on Windows. The free version provides excellent functionality, while the premium version adds the attractive Big Box interface designed for controller navigation.
The software automatically downloads game artwork, descriptions, and metadata, creating a professional presentation that rivals commercial gaming systems. Integration with multiple emulators happens automatically with minimal configuration required.
[Image: LaunchBox Big Box interface showing game collection with artwork]
Alt text: LaunchBox Big Box main interface displaying retro game collection with box art and descriptions
- LaunchBox Advantages:
- Automatic metadata and artwork downloads
- Beautiful Big Box interface for TV gaming
- Excellent emulator integration and management
- Active community and regular updates
- Powerful game organization and filtering tools
- System Requirements:
- Windows 7 or newer operating system
- 2GB RAM minimum, 4GB recommended
- DirectX 11 compatible graphics card
- Internet connection for metadata downloads
EmulationStation provides a cross-platform alternative that works excellently on Linux systems. Originally developed for RetroPie, standalone versions work on Windows and macOS with proper configuration.
The interface emphasizes simplicity and speed over visual flair. Configuration requires more manual work compared to LaunchBox, but the lightweight nature makes it perfect for older laptop hardware.Frontend Software Platform Support Ease of Setup Visual Appeal Performance Impact LaunchBox/Big Box Windows only Very Easy Excellent Moderate EmulationStation Cross-platform Moderate Good Low Attract-Mode Cross-platform Difficult Customizable Low Pegasus Frontend Cross-platform Moderate Modern Low HyperSpin Windows only Very Difficult Flashy High
Step-by-Step Installation Guide
This installation process focuses on LaunchBox as the most user-friendly option for Windows users. The same general principles apply to other frontend software with platform-specific variations.
Phase 1: Software Installation and Initial Setup
- Download LaunchBox: Visit the official website and download the free version
- Create directory structure: Organize folders for emulators, ROMs, and media files
- Install emulators: Download and configure individual emulators for each system
- Configure emulator paths: Point LaunchBox to each emulator’s executable file
- Test individual emulators: Ensure each emulator works independently before integration
Organization Tip: Create a dedicated “Retro Gaming” folder with subfolders for Emulators, ROMs, Media, and Saves. This structure simplifies troubleshooting and backup procedures.
Phase 2: Game Import and Configuration
- Import ROM files: Use LaunchBox’s import wizard to add games systematically
- Download metadata: Allow automatic download of game information and artwork
- Configure controller inputs: Set up controllers for each emulated system
- Test game launches: Verify that games launch correctly from the frontend
- Customize interface: Adjust themes and layouts to personal preferences
ROM Management and Organization
[Image: Well-organized ROM folder structure showing different gaming systems]
Alt text: Computer folder structure showing organized ROM files by gaming system and region
Effective ROM management prevents the chaos that typically accompanies large game collections. Consistent naming conventions, proper folder structures, and regular maintenance keep your gaming console setup running smoothly.
ROM file naming directly impacts frontend functionality and automatic metadata detection. Following established naming conventions ensures compatibility with databases and artwork services.
- Recommended Folder Structure:
- ROMs/Nintendo/NES/ – Nintendo Entertainment System games
- ROMs/Nintendo/SNES/ – Super Nintendo games
- ROMs/Sega/Genesis/ – Sega Genesis games
- ROMs/Sony/PlayStation/ – PlayStation games
- ROMs/Arcade/MAME/ – Arcade games
- File Naming Best Practices:
- Use No-Intro or GoodSets naming standards
- Include region codes in parentheses (USA), (Japan), (Europe)
- Maintain consistent formatting across all systems
- Remove special characters that cause path issues
Legal Considerations and ROM Sources
Legal Notice: This guide does not encourage piracy or illegal ROM distribution. Ensure you own physical copies of games before downloading ROM files, and respect copyright laws in your jurisdiction.
Understanding the legal landscape surrounding ROM files helps you build your collection responsibly. Several legitimate sources provide legal ROM downloads, though options remain limited compared to unofficial sources.
Homebrew games and open-source titles offer excellent legal alternatives for testing your retro gaming pc setup. These games often showcase impressive technical achievements within original hardware constraints.
- Legal ROM Sources:
- Internet Archive – Historical software preservation
- Console manufacturer official releases
- Homebrew development communities
- Public domain and open-source games
- ROM Backup Guidelines:
- Own physical copies of games before downloading
- Use personal backup devices when possible
- Respect regional copyright differences
- Support official re-releases when available
Using Controllers and Display Options
Authentic gaming experiences require proper input devices and display configurations that honor the original intent of classic games. Modern technology offers numerous enhancements while maintaining the essential character of retro gaming.
This final section covers controller selection, configuration strategies, and display optimization techniques. These elements complete your transformation from old laptop emulator to professional gaming console setup.
Controller Selection and Compatibility
Controller choice significantly impacts your enjoyment of different gaming systems. While modern controllers offer convenience and wireless connectivity, authentic reproductions provide the tactile experience that developers originally intended.
USB adapters for original controllers represent the best of both worlds, allowing use of authentic hardware with modern convenience. However, compatibility and availability vary significantly between different gaming systems.
Controller Type Best Gaming Systems Advantages Disadvantages Recommended Models Xbox 360/One Controller Universal compatibility Excellent Windows support, wireless Wrong button layout for Nintendo systems Microsoft official controllers PlayStation 4/5 Controller PlayStation emulation Authentic Sony layout, touchpad Requires DS4Windows software Sony DualShock/DualSense 8BitDo Controllers Nintendo systems, arcade Authentic layouts, multiple connection options Higher cost than generic options SN30 Pro+, M30 2.4G USB Arcade Sticks Arcade games, fighting games Authentic arcade experience Large size, limited game compatibility Mayflash F300, Qanba Drone Original + USB Adapter System-specific authenticity 100% authentic experience Requires multiple controllers, wear issues RetroUSB adapters, Raphnet adapters
Controller Configuration Strategies
Proper controller configuration eliminates the frustration of incompatible button mappings and ensures consistent experiences across different emulated systems. Each emulator handles controller input differently, requiring system-specific optimization.
Modern controller mapping software provides advanced features like per-game profiles, macro buttons, and analog stick customization. These tools bridge compatibility gaps between modern controllers and retro gaming requirements.
- Universal Configuration Tools:
- Steam Controller Configuration – Works with any controller
- DS4Windows – PlayStation controller support on Windows
- AntiMicro – Open-source controller mapping
- JoyToKey – Lightweight keyboard/mouse mapping
- Configuration Best Practices:
- Create separate profiles for each gaming system
- Map pause/menu functions to consistent buttons
- Configure save state shortcuts for quick access
- Test configurations with multiple games per system
- Document custom mappings for future reference
Display Optimization and Video Enhancement
[Image: Before and after comparison showing video enhancement effects on retro games]
Alt text: Split screen comparison demonstrating video filters and enhancement effects on classic games
Modern displays present both opportunities and challenges for retro gaming. High-resolution screens allow for crisp scaling and enhancement effects, but can also introduce input lag and display compatibility issues.
Emulator-specific enhancement options provide dramatic visual improvements while maintaining game authenticity. However, these enhancements require careful configuration to avoid performance penalties on older hardware.
- Scaling and Filter Options:
- Integer scaling – Maintains pixel-perfect ratios
- Bilinear filtering – Smooths pixel edges
- CRT shaders – Simulates authentic CRT monitor effects
- Scanline filters – Adds horizontal lines for authenticity
- NTSC filters – Recreates analog video signal artifacts
- Performance Considerations:
- Higher resolution outputs require more GPU power
- Complex shaders can cause frame rate drops
- Multiple monitor setups increase system load
- V-sync settings affect input lag and smoothness
Audio Configuration and Enhancement
Audio quality often receives less attention than video in retro gaming setups, but proper configuration significantly enhances the overall experience. Many classic games relied heavily on audio design to create atmosphere and provide gameplay feedback.
Modern audio enhancement options can improve upon original hardware limitations while maintaining authentic character. However, these enhancements must be applied judiciously to avoid distorting the intended audio experience.
Audio Tip: Many emulators offer high-quality audio resampling that dramatically improves sound quality over original hardware. Enable these features when available for better audio fidelity.
- Audio Enhancement Features:
- High-quality resampling – Reduces audio artifacts
- Stereo widening – Enhances spatial audio effects
- Dynamic range compression – Evens out volume levels
- Audio latency adjustment – Synchronizes audio with video
- Hardware Recommendations:
- External USB audio interfaces for better quality
- Gaming headsets with low-latency drivers
- Dedicated speakers for authentic arcade experience
- Audio splitters for multiplayer gaming sessions
Troubleshooting Common Issues
Even the most carefully planned retro gaming pc build encounters occasional technical challenges. This troubleshooting section addresses the most common issues that arise during setup and ongoing use.
Systematic troubleshooting approaches save time and prevent frustration when problems inevitably occur. Most issues fall into predictable categories with established solution methods.Problem Category Common Symptoms Likely Causes Solution Approach Performance Issues Slow frame rates, audio stuttering Insufficient hardware, poor optimization Reduce emulator settings, close background apps Controller Problems Unresponsive inputs, wrong mappings Driver issues, configuration errors Update drivers, reconfigure button mappings Audio/Video Sync Audio lag, screen tearing Buffer settings, V-sync configuration Adjust audio latency, enable/disable V-sync Game Compatibility Games won’t load, crashes Wrong ROM versions, emulator bugs Try different ROM dumps, update emulators Frontend Issues Games don’t launch, missing artwork Path problems, network connectivity Verify file paths, check internet connection
Conclusion
Transforming your old laptop emulator into a dedicated retro gaming console represents both a practical recycling solution and a gateway to gaming history. The process requires patience and technical knowledge, but the results justify the investment of time and effort.
Your completed gaming console setup provides access to decades of gaming evolution in a single, portable package. Unlike commercial retro gaming solutions, your custom build offers unlimited expandability and customization options tailored to your specific preferences.
The knowledge gained through this project extends beyond simple emulation setup. Understanding hardware optimization, software configuration, and troubleshooting techniques provides valuable skills applicable to many computing challenges.
Most importantly, your repurpose laptop project preserves gaming history while creating new memories. Whether reliving childhood favorites or discovering classic games for the first time, your retro gaming pc opens doors to experiences that remain relevant and enjoyable decades after their original release.
Final Recommendation: Start small with familiar systems and expand gradually. The best emulation setup grows organically based on your gaming preferences and hardware capabilities.
The retro gaming community continues to evolve with new emulators, enhancement techniques, and preservation efforts. Your participation in this community through responsible collecting and sharing knowledge helps ensure these gaming treasures remain accessible for future generations.
Enjoy your journey through gaming history, and remember that the perfect setup is the one that brings you the most gaming satisfaction, regardless of technical specifications or complexity.