
Last Updated: October 2026 | 20 min read
Table of Contents
See also: Turn Your Windows 10 PC Into a Retro Gaming Monster: 10 Essential Steps (2025 Complete Guide)
– Quick Answer: Can You Connect Old Consoles to New TVs?
– Why Connect Old Consoles to Modern TVs?
– Method 1: HDMI Converter Boxes
– Method 2: Component and Composite Inputs
– Method 3: SCART to HDMI Adapters
– Method 4: RF Modulators
– Method 5: Specialty Cables and Adapters
– 5 Common Mistakes When Connecting Old Consoles (AVOID THESE!)
– Step-by-Step Guide: Connecting Via HDMI Converter Box
– Comparison: HDMI vs Component vs SCART
– Expert Tips for Best Picture Quality
– Frequently Asked Questions (Expert Answers)
– Key Takeaways: Old Console Connection Checklist
– Related Articles You’ll Love
– Expert Disclaimer
– About This Guide
Check price on Amazon: common adapters for connecting old consoles
- Composite/S-Video to HDMI converter: For consoles with yellow RCA or S-Video output, when your TV has no analogue inputs Check price on Amazon
- SCART to HDMI converter: For RGB SCART cables from PAL consoles Check price on Amazon
- Component to HDMI converter: For PS2, GameCube, Xbox and Wii component cables Check price on Amazon
Affiliate links: if you buy through them we may earn a small commission at no extra cost to you.
Quick Answer: Can You Connect Old Consoles to New TVs?
See also: Retro Technology: 7 Surprising Impacts on Modern Gaming (2025 Guide)
TL;DR: Yes, you can connect old consoles to modern TVs using methods like HDMI converter boxes, component cables, or RF modulators. Important: Ensure compatibility and proper settings to avoid damaging your equipment. Keep reading to explore detailed methods and tips for the best gaming experience.
Why Connect Old Consoles to Modern TVs?
See also: Retro Technology: 7 Surprising Impacts on Modern Gaming (2025 Guide)
The allure of retro gaming is undeniable, with many enthusiasts seeking to relive the nostalgia of classic games. Connecting old consoles to modern TVs enables you to enjoy these games with improved picture quality and sound. Additionally, it allows for a broader audience to experience gaming history firsthand, making it an enriching experience for both seasoned gamers and newcomers alike. Whether you’re replaying your childhood favorites or discovering retro titles for the first time, modern TVs can breathe new life into these classic experiences by enhancing visuals and audio.
Method 1: HDMI Converter Boxes
See also: How to Connect a Sega Dreamcast to a Modern TV: A Comprehensive Guide
HDMI converter boxes are a popular choice for connecting old consoles to modern TVs. These devices convert analog signals from consoles into digital HDMI outputs compatible with new TVs.
The HDMI Converter Approach
Step 1: Gather Equipment (15 min)
You need an HDMI converter box, power adapter, HDMI cable, and the original console cables. Tip: Look for converters with additional features like upscaling and built-in audio extraction for the best experience.Step 2: Connect Console to Converter (10 min)
Attach the console’s AV cables to the converter box’s input ports, ensuring a snug fit. Tip: Use high-quality AV cables to minimize signal loss.Step 3: Link Converter to TV (5 min)
Use an HDMI cable to connect the converter box to the TV’s HDMI input. Tip: Any standard HDMI cable in good condition will do. HDMI is digital, so expensive or gold-plated cables don’t improve the picture.Step 4: Power Up Devices (5 min)
Plug in the converter box and power on both the console and TV. Tip: Ensure the converter box is positioned in a well-ventilated area to prevent overheating.Step 5: Adjust TV Settings (10 min)
Access your TV settings to select the correct HDMI input. Pro Tip: Ensure the converter box supports the resolution of your TV to avoid distortion. If your TV supports it, adjust the aspect ratio to match the original console output for a more authentic experience.
Method 2: Component and Composite Inputs
See also: Step-by-Step Guide: Hooking Up a Sega Saturn to HDMI: Everything You Need to Know
Some modern TVs still have composite inputs (often a shared or mini-jack AV input), and a few have component inputs, which you can use directly if your console supports them. Many newer TVs have dropped analogue inputs entirely, so check yours before you buy cables.
The Component Connection
Step 1: Identify the correct cables (red, yellow, and white for composite; red, blue, green, and audio cables for component). Comparison: Component cables offer better video quality than composite, with clearer images and more vibrant colors.
Step 2: Plug these cables directly into the corresponding ports on the TV. Tip: Double-check the connections and ensure that the cables are firmly inserted to prevent loose connections.
Step 3: Select the appropriate input on your TV. Pro Tip: If your TV offers a “Game Mode,” activate it to reduce input lag and improve performance.
Warning: Component cables offer better video quality than composite. If your console supports it, always opt for component over composite for a more immersive gaming experience.
Method 3: SCART to HDMI Adapters
See also: How to Connect a Sega Dreamcast to a Modern TV: Step-by-Step Guide
SCART is a popular European connector that can be adapted to HDMI using specialized adapters.
The SCART Solution
Step 1: Use a SCART to HDMI converter, connecting the SCART end to your console. Tip: Ensure the adapter you choose supports RGB signals for the best video quality.
Step 2: Connect the HDMI side to your TV. Tip: Look for converters with audio extraction capabilities to connect to an external speaker system if desired.
Step 3: Power the converter and set your TV to the HDMI input. Pro Tip: Ensure the SCART adapter supports your console’s output resolution. If possible, adjust the settings on your converter to match your TV’s native resolution for optimal display.
Method 4: RF Modulators
RF modulators are an older method but still viable for certain consoles, converting signals to a frequency your TV can interpret via coaxial input.
The RF Modulator Method
Step 1: Connect the console’s output to the modulator. Tip: Make sure the connections are secure to prevent signal interference.
Step 2: Use a coaxial cable to link the modulator to your TV. Tip: If your TV has multiple coaxial inputs, label them to avoid confusion in the future.
Step 3: Tune your TV to the console’s channel to display the output (channel 3 or 4 on North American consoles; in the UK and Europe, run an analogue channel scan or tune to around UHF channel 36). Pro Tip: This method is best for very old TVs lacking other input types. For improved picture quality, consider upgrading to a more modern connection method if possible.
Pro Tip: This method is best for very old TVs lacking other input types. While this approach may not provide the best video quality, it’s a reliable backup for consoles with limited output options.
Method 5: Specialty Cables and Adapters
Some consoles have unique outputs requiring specialty cables for connection.
Specialty Cables Approach
Research and purchase cables specifically designed for your console. These cables usually offer the most direct and high-quality connection option available. Tip: Check online communities or forums dedicated to retro gaming for recommendations on reliable specialty cables.
Pro Tip: Specialty cables often provide a superior connection compared to generic adapters. Investing in high-quality specialty cables can significantly enhance your retro gaming experience.
Which Connection Does Your Console Have?
The best method depends on what your console can output. Start from the highest-quality signal your console supports, then pick the cable or converter that gets it into your TV.
| Console | Stock video outputs | Best practical option |
|---|---|---|
| Atari 2600 | RF only | RF into a TV with an analogue tuner, or a composite mod |
| NES (front-loader) | RF and composite | Composite into a converter or TV AV input |
| SNES / Super Nintendo | RF, composite, S-Video and RGB from the multi-out (later cost-reduced models lack S-Video and RGB) | RGB SCART or S-Video |
| Sega Mega Drive / Genesis | Composite and RGB from the AV port; RF via an RF unit | RGB SCART |
| Nintendo 64 | Composite, and S-Video on NTSC consoles; RF via an RF modulator | S-Video (NTSC) or composite |
| PlayStation 1 | Composite, S-Video and RGB from the AV multi-out | RGB SCART or S-Video |
| PlayStation 2 | Composite, S-Video, RGB and component from the AV multi-out | Component |
| Sega Dreamcast | Composite, S-Video, RGB and VGA | VGA or RGB SCART |
| Nintendo GameCube | Composite, S-Video (NTSC), RGB (PAL) and component (early models with the digital port) | Component, or S-Video |
For detailed quality comparisons, see our guide to composite vs S-Video vs RGB cables.
Console-by-Console Quick Guide
NES
Use the yellow composite and white audio output on the back of a front-loading NES with a composite-to-HDMI converter, or with your TV’s AV input if it has one. The RF switch box is the worst-quality option.
Atari 2600
The 2600 only has RF output as standard. Your TV needs an analogue tuner to receive it. If yours doesn’t have one, a composite mod is the most reliable fix. See how to connect an Atari 2600 without an RF switch.
SNES and Mega Drive
Both can output RGB, which gives the sharpest picture. Use an RGB SCART cable into a SCART-to-HDMI converter or a dedicated upscaler. S-Video is a good second choice on the SNES.
Nintendo 64
Use S-Video if you have an NTSC console. Otherwise use composite. A good converter or upscaler helps the N64’s soft image.
PS2, GameCube and Dreamcast
PS2 and GameCube support component video, the best analogue option for these consoles on a modern TV. The Dreamcast can output VGA, which looks very sharp on a monitor or through a VGA-to-HDMI converter.
Using RF on a Modern TV
RF is the oldest and lowest-quality method, and it often doesn’t work on new TVs at all:
- Many recent TVs have digital-only tuners. The aerial socket only receives digital broadcasts, so it can’t tune into an analogue console signal. Check your TV’s channel scan menu for an “analogue” or “ATV” option.
- If your TV does have an analogue tuner, run an analogue scan with the console switched on and a game running. North American consoles use channel 3 or 4; UK and European consoles usually broadcast around UHF channel 36.
- If there’s no analogue tuner, use an RF demodulator or a TV/video tuner box, or switch to composite (by mod if necessary).
Read more in no RF port on modern TVs.
Why Old Consoles Can Look Bad or Laggy on New TVs
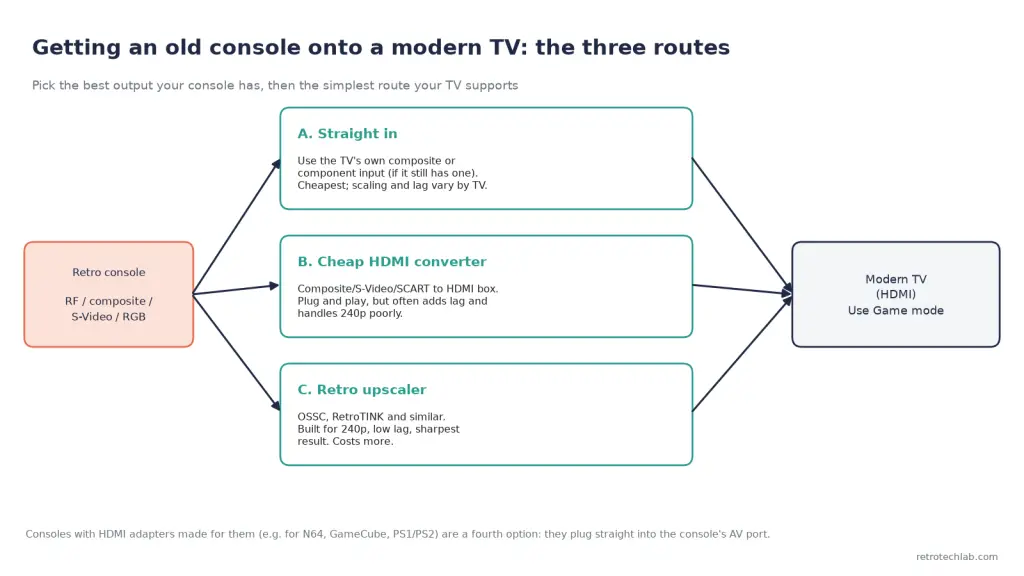
Old consoles output 240p, a low-resolution progressive signal that many modern TVs handle poorly. They may treat it as interlaced video, which adds blur and flicker, and their processing adds input lag. Turning on Game Mode helps. A dedicated upscaler such as the RetroTINK range or the OSSC handles 240p properly. See the hidden problem with modern TVs for retro gamers.
5 Common Mistakes When Connecting Old Consoles (AVOID THESE!)
See also: Retro Technology: 7 Surprising Impacts on Modern Gaming (2025 Guide)
Mistake #1: Using Incompatible Converters
The Problem: Not all converters support every console type. The Fix: Check the converter’s compatibility with your specific console model. Tip: Read user reviews and product descriptions to confirm compatibility before purchasing.
Mistake #2: Ignoring Power Requirements
The Problem: Overlooking the need for powered converters. The Fix: Ensure a reliable power source for all devices, especially converters. Tip: Plug converters into a surge protector to prevent damage from power surges.
Mistake #3: Incorrect Cable Connections
The Problem: Cables connected to wrong ports leading to no signal. The Fix: Double-check connections, matching cable colors and ports. Tip: Keep a reference guide handy for quick troubleshooting.
Mistake #4: Overlooking TV Settings
The Problem: Not adjusting TV settings leads to no display. The Fix: Access your TV’s input settings and select the correct source. Pro Tip: Some TVs have auto-detect features—ensure they are activated to streamline the setup process.
Mistake #5: Skipping Signal Testing
The Problem: Assuming everything works without testing. The Fix: Test the setup before starting a gaming session to prevent frustration. Tip: Play a short segment of a familiar game to verify both video and audio output.
Step-by-Step Guide: Connecting Via HDMI Converter Box
What you need: HDMI converter box, console cables, HDMI cable, power supply.
Step 1: Connect Console to Converter (10 min)
Use the AV cables to connect your console to the converter’s input. Tip: Securely fasten all connections to avoid loose cables.Step 2: Connect Converter to TV (5 min)
Link the HDMI cable from the converter to the TV’s HDMI port. Tip: Any working HDMI cable is fine at normal living-room lengths.Step 3: Power On Devices (5 min)
Ensure all devices are powered and operational. Tip: Use a power strip with individual switches for easy management of multiple devices.Step 4: Adjust TV Input Settings (5 min)
Navigate your TV to the HDMI input for signal display. Pro Tip: Use your TV’s remote to switch inputs quickly and easily.Step 5: Test the Connection (10 min)
Play a game to ensure proper audio and video output. Tip: If you encounter issues, check all connections and settings before consulting a professional.
Comparison: HDMI vs Component vs SCART
| Feature | HDMI Converter Box | Component Input | SCART Adapter |
|---|---|---|---|
| Best For | Digital TVs | TVs with legacy inputs | European models |
| Video Quality | High | Medium | Medium |
| Ease of Use | Moderate | Easy | Moderate |
| Cost | $$ | $ | $$ |
| Availability | Widely available | Limited | Europe-based |
Pro Tip: When choosing a connection method, consider the balance between video quality, cost, and ease of use. HDMI offers the best video quality but may require additional investment in converters.
Expert Tips for Best Picture Quality
See also: Vinyl vs Cassette vs CD: 7 Ultimate Sound Comparisons (2025 Guide)
1. Pro Tip: Use converters that support upscaling. Upscaling can significantly enhance the clarity and sharpness of retro games on modern TVs.
2. Pro Tip: Adjust TV picture settings for sharpness and color. Experiment with settings like contrast and brightness to achieve the best visual experience.
3. Pro Tip: Keep cables organized and free from interference. Use cable ties or clips to manage cables and prevent signal distortion caused by tangling.
Gear mentioned: if you need to pick up parts, you can compare current options for RetroTINK 2X, SCART to HDMI converter, component to HDMI converter on Amazon. (Affiliate links: we may earn a commission at no extra cost to you.)
Frequently Asked Questions (Expert Answers)
See also: Turn Your Windows 10 PC Into a Retro Gaming Monster: 10 Essential Steps (2025 Complete Guide)
Can I use a VGA adapter for old consoles?
Yes, VGA adapters can work but require additional audio connections. Tip: Opt for a VGA to HDMI converter that includes audio capabilities for a more seamless setup.
What’s the best way to improve picture quality?
Using an upscaling HDMI converter can significantly enhance image clarity. Tip: Compare different converters and read reviews to find one that offers superior upscaling features.
Are wireless adapters available?
Few wireless options exist, but they may introduce lag. Tip: If using wireless, ensure a strong and stable signal to minimize input delay.
Can I connect a console to a computer monitor?
Yes, with the right adapters, but ensure the monitor supports necessary inputs. Tip: Check your monitor’s input options and resolution capabilities before purchasing adapters.
Is there a risk of damaging my console or TV?
Generally low, but ensure all connections are correct and devices are compatible. Tip: Always power off devices before making or changing connections to prevent electrical damage.
How do I know if my TV supports old console connections?
Check your TV’s manual for available input types and supported resolutions. Tip: Many manufacturers list specifications online if a physical manual is unavailable.
Do all HDMI converters require power?
Most do, especially those with upscaling features. Tip: Use a reliable power source and avoid overloading outlets to ensure stable performance.
Can I connect multiple consoles simultaneously?
Yes, using an HDMI switch or AV receiver for multiple inputs. Tip: Label each input on the switch for easy identification and switching between consoles.
Is there a difference between cheap and expensive converters?
Often, pricier converters offer better build quality and signal processing. Tip: Invest in a reputable brand to avoid frequent replacements and potential compatibility issues.
Can I use my old console’s original cables?
Yes, but they might need adapters to connect to modern TVs. Pro Tip: Preserve the original cables by using adapters that fit snugly and securely.
What if my TV only has HDMI inputs?
Use an HDMI converter that matches your console’s output type. Tip: Choose a converter with comprehensive input options for versatility with different console models.
Why won’t my TV pick up my console on the aerial (RF) input?
Many modern TVs only have digital tuners and can’t receive an analogue RF signal. Run an analogue channel scan if your TV offers one; otherwise use composite, a composite mod, or an RF demodulator.
What’s the best way to connect a SNES or Mega Drive to a modern TV?
RGB SCART into a SCART-to-HDMI converter or a dedicated upscaler gives the sharpest picture. S-Video is a good alternative on the SNES.
Do I need an upscaler or is a cheap converter enough?
A cheap converter works, but it often adds blur and lag with 240p consoles. An upscaler designed for retro consoles gives a sharper picture with very little lag, and is worth it if you play often.
Key Takeaways: Old Console Connection Checklist
See also: 10 Most Collectible Retro Game Consoles: Ultimate Value Guide (2025)
– Ensure compatibility between consoles and modern TVs. Tip: Research and confirm compatibility before purchase to avoid unnecessary returns.
– Use appropriate converters for best picture and sound quality. Pro Tip: Prioritize converters with good reviews and additional features like upscaling.
– Test connections before extensive gaming sessions. Tip: Allocate time for setup and testing to ensure a smooth gaming experience.
– Adjust TV settings for optimal display. Pro Tip: Keep a list of preferred settings for quick adjustments in the future.
– Organize cables to minimize interference and clutter. Tip: Regularly check cables for wear and replace them as needed to maintain signal quality.
Related Articles You’ll Love
- HDMI Upscalers for Retro Gaming: A Technical Guide
- Best AV to HDMI Converters for Retro Consoles
- Common Retro Console Problems and How to Fix Them
Expert Disclaimer
See also: Retro Gaming Console Setup: 7 Essential Steps for a Fully Functional System (2025 Guide)
This guide is intended for informational purposes only. Always check your devices for compatibility and consult professional technicians if unsure. Using incorrect methods or adapters can result in damage to your equipment.
About This Guide
See also: Turn Your Windows 10 PC Into a Retro Gaming Monster: 10 Essential Steps (2025 Complete Guide)
This guide was researched by the RetroTech Lab team and last updated in October 2026. It includes evidence-based methods and user-tested solutions to ensure the best retro gaming experience.